Learn at your own pace
Basic Stitch Tutorials
Choose a lesson, open the steps, and take another look whenever you need it.
Crochet basics
Hold a hook & yarn
How to hold a crochet hook and yarn
As a crochet beginner, one of the first things you’ll need to learn is how to get a grip on your crochet tools. The wonderful thing about crochet is that you only need 2 things – a hook and some yarn. If you’re right-handed, hold the hook in your right hand and yarn in the other. If you’re left-handed, switch sides.
How to hold a crochet hook (step-by-step with photos)
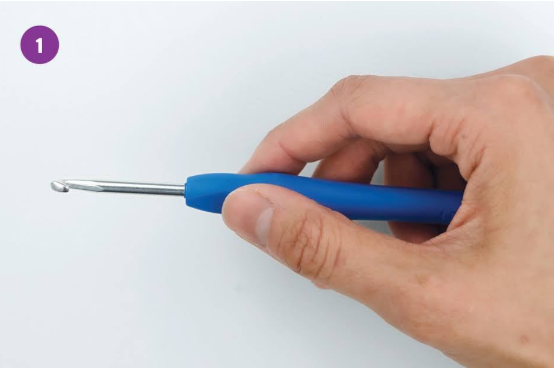
There are two ways to hold a crochet hook. Do what’s comfiest for you:
1. Overhand grip
Hold the hook like a knife.
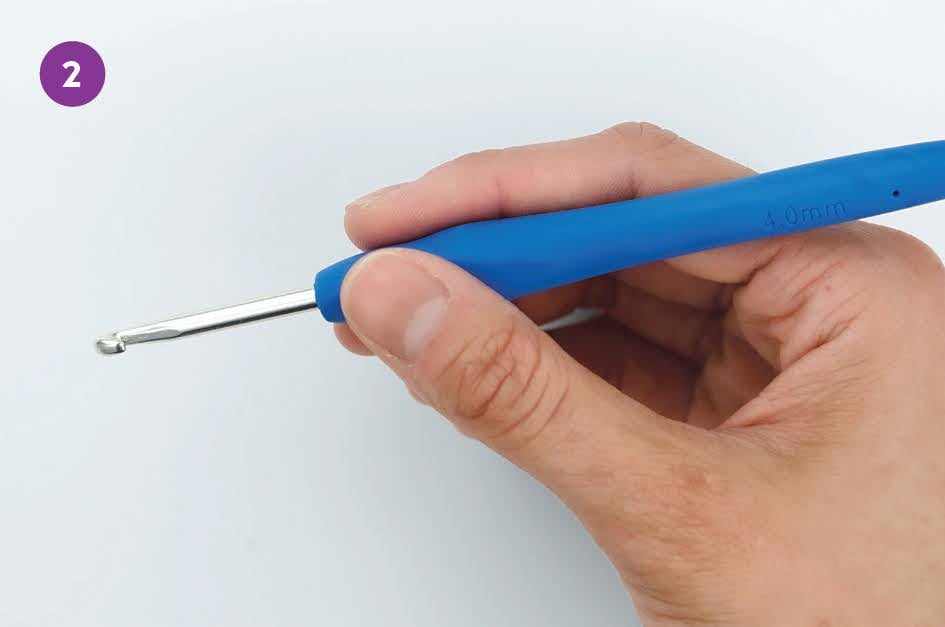
2. Pencil grip
Or hold the hook like a pencil, resting the hook on your middle finger and holding it between your thumb and pointer finger.
How to hold crochet yarn (step-by-step with photos)
Hold the yarn with your right hand. There are lots of ways to hold yarn—the way I hold it is the way my mom taught me. Just like with the hook grip, do what’s comfiest for you. The most important thing is to keep constant tension with the working yarn, so that your stitches come out evenly. Did you read that last sentence and wonder—does my yarn have a 9-to-5 job? Let’s pause and cover some terminology:
WORKING YARN: The yarn connected to the ball. It’s the yarn you’ll literally “work” with to crochet.
TAIL: The end of the yarn.

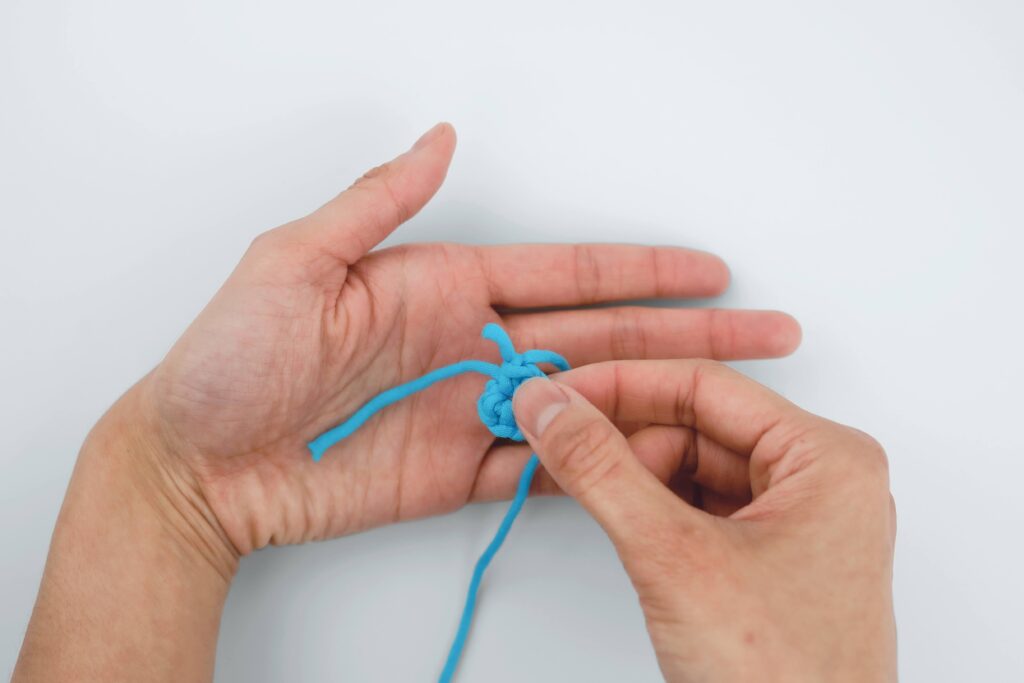
1.Turn your left palm to face you. Hold your piece in front of your hand.
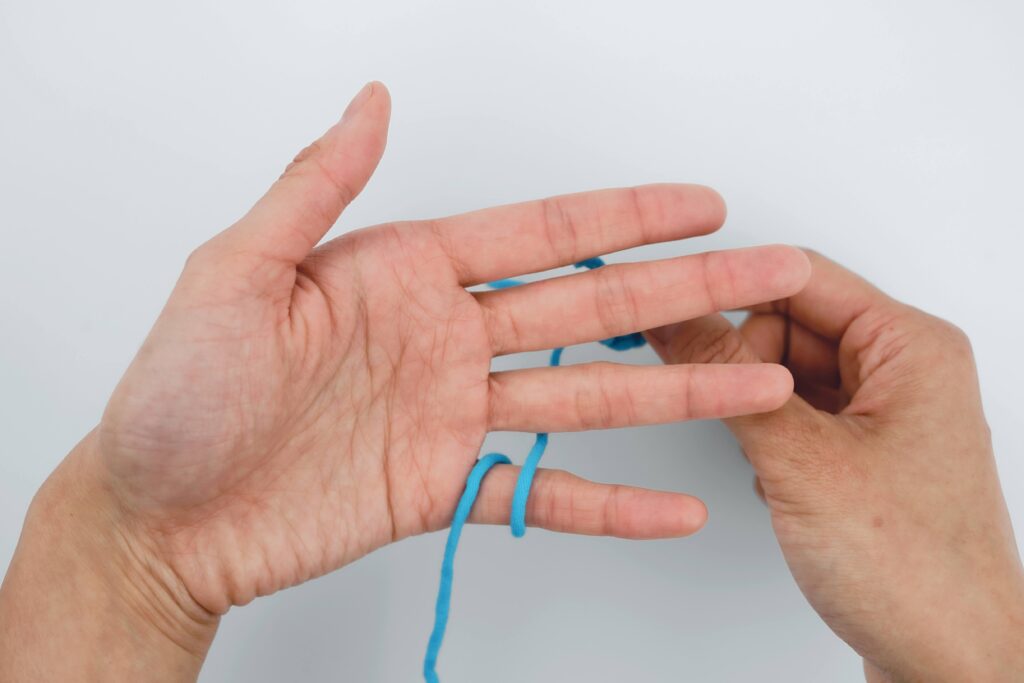
2. Wrap the working yarn once around your pinky, so that the piece ends up behind your hand.
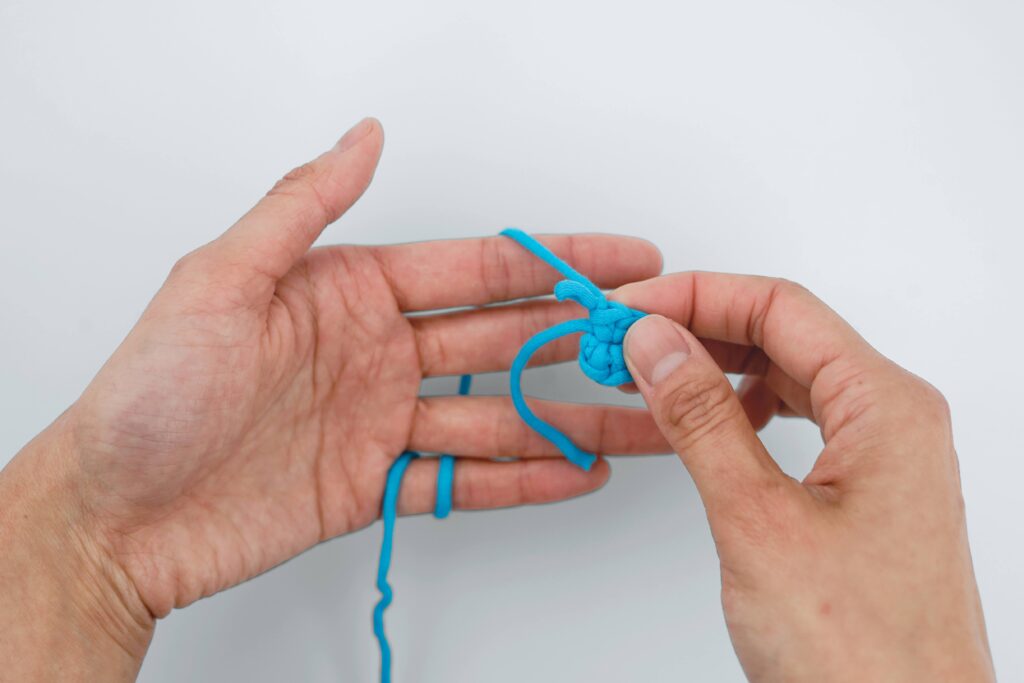
3. Bring the piece up the back of your hand until you can drape it over your pointer finger.
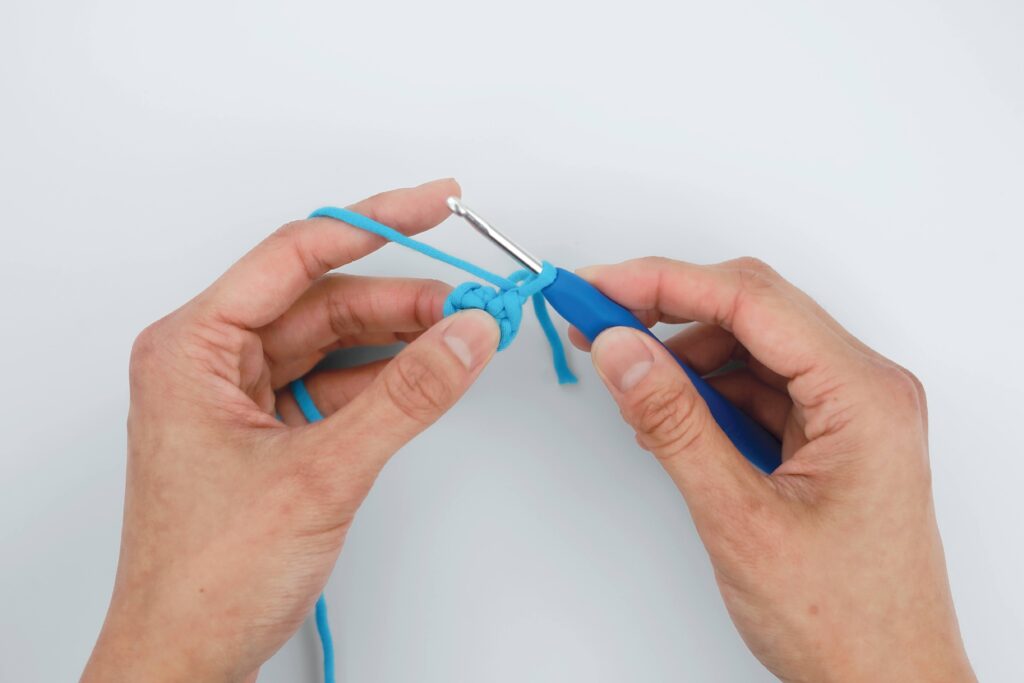
4. Hold onto the piece with your thumb and middle finger. Move the yarn tail behind your piece. To tighten or loosen the tension of the working yarn, move your pointer finger towards or away from you. The loop for the hook should be in the upper right-hand corner, and your next stitch will be crocheted to the right.
TIP
If your working yarn is super loose after following these steps, try doing step 2 as close as possible to your piece.
When you put it all together, the hook should be in front of your working yarn. Your final crocheting position should look something like this:
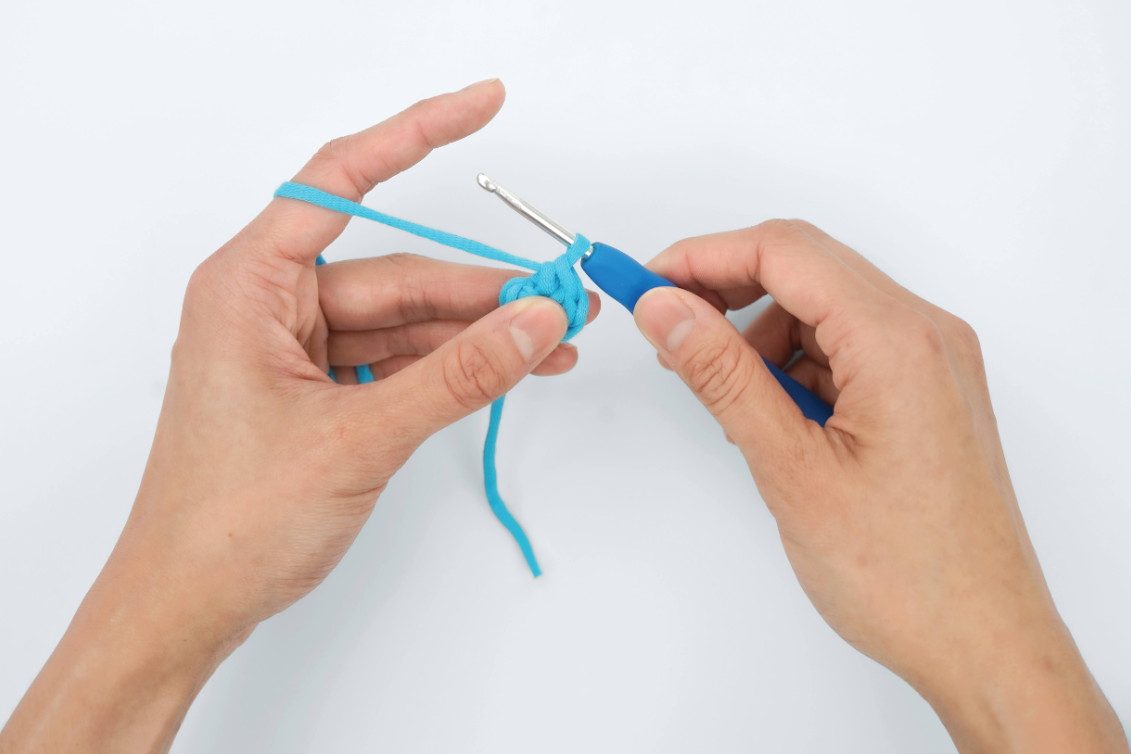
Still have questions?
Where can I buy crochet hooks and yarn?
You can buy crochet hooks and yarn at a variety of places. Some popular options include craft stores like Michael’s or Jo-Ann, online retailers like Amazon or Etsy, and even big-box stores like Walmart or Target. You can also check out your local yarn store. They’ll have a wide selection of yarns and crochet hooks. You can also buy crochet hooks and yarns online on websites like LoveCrafts.
What is Easy Peasy yarn?
You can buy crochet hooks and yarn at a variety of places. Some popular options include craft stores like Michael’s or Jo-Ann, online retailers like Amazon or Etsy, and even big-box stores like Walmart or Target. You can also check out your local yarn store. They’ll have a wide selection of yarns and crochet hooks. You can also buy crochet hooks and yarns online on websites like LoveCrafts.
Still have a question? See our FAQ or e-mail us.
Count stitches, rounds, and rows
Parts of a crochet stitch
When you’re new to crocheting, you’ll probably ask yourself: “where, oh where does my crochet hook go next?” after almost every stitch you make. Unless a pattern says otherwise, put the hook under both top loops. Sometimes a pattern might tell you to put the hook through the front loop only (flo) or back loop only (blo). To do that, first make sure the “right side” of your piece is facing you. Then insert the hook under only one of the top loops. The loop closer to you is the front loop, and the loop further from you is the back loop.
Crochet through both loops
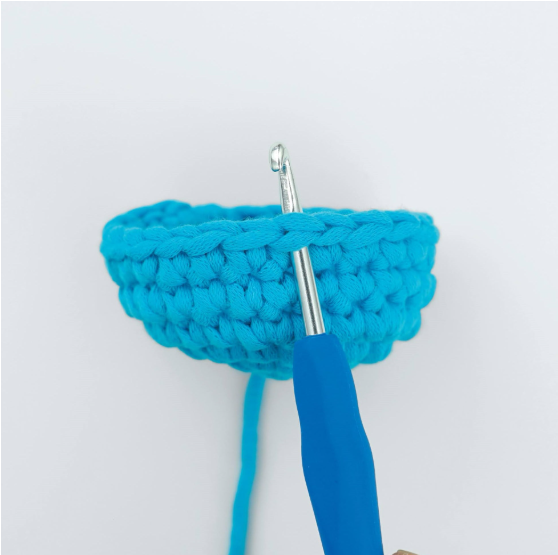
Unless the pattern says otherwise, start a new stitch by inserting the hook under both top loops.

This creates an even look throughout your work.
Crochet through front loops only (tflo)

With the right side of your work facing you, insert the hook under only the front loop.

This will create a ridge on the wrong side of your work.
Crochet through back loops only (tblo)

With the right side of your work facing you, insert the hook under only the back loop.
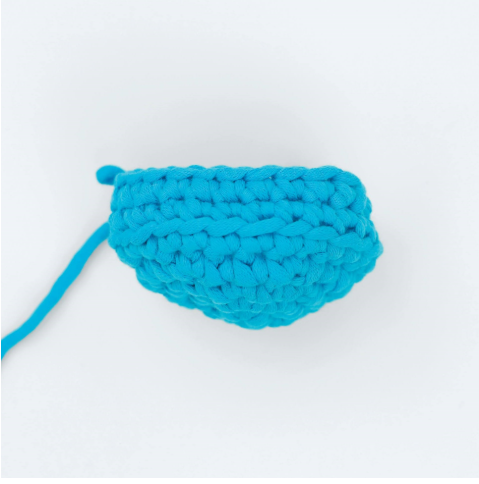
This will create a ridge on the right side of your work. This technique is often used to make it easier to then attach content to the remaining front loops.
How do you tell where to insert your hook into next? If you’re right-handed, the next stitch is to the left of the one you just completed. If you’re left-handed, the next stitch is to the right. Either way, with the right side of your piece facing you, a completed stitch looks like a vertical V. To find where to insert your hook to create the next stitch, look at your piece from the top down and look for the next horizontal V.
Still have questions?
How many crochet stitches are there?
The single crochet: This is a basic stitch that you’ll find in many different crochet projects, particularly in our beginner Vioiv kits.
The half-double crochet: This stitch is a little bit taller than the single crochet.
The double crochet: This is the tallest of the basic stitches.
The increase stitch: Whether you’re starting with a magic ring or a foundation chain, when crocheting in the round, you’re going to need to use increase stitches to make your project bigger. To make an increase stitch, you’re essentially doing two stitches in the next stitch.
The decrease stitch: The decrease stitch is the opposite of an increase stitch and is another common stitch when working in the round. Instead of doing two stitches in one, you’ll be combining two stitches to make your crochet project smaller.
These are just a few examples, and there are many other stitches out there that can be used to create a variety of different fabrics and textures. It’s a lot of fun to experiment with different stitches and see what kind of fabrics they create. Happy crocheting!
What crochet stitch works up the fastest?
If you’re looking for a crochet stitch that works up the fastest, then the treble crochet stitch is your best bet. It’s a great choice if you’re looking to create a project quickly. The treble crochet stitch is also sometimes referred to as triple crochet in North America and double-trefoil in Britain. This simple but effective stitch can be used in a variety of ways, from creating quick blankets and scarves to creating intricate designs and embellishments for clothing or home decor items.
Still have a question? See our FAQ or e-mail us.
Identify the right side of crochet
How to identify the right and wrong side of crochet
There’s a so-called right and wrong side of crochet. That sounds a bit harsh, so another way of thinking about it is that there’s a front and back side to your work. Here’s a picture of the same pattern, with the wrong side versus the right side facing out.
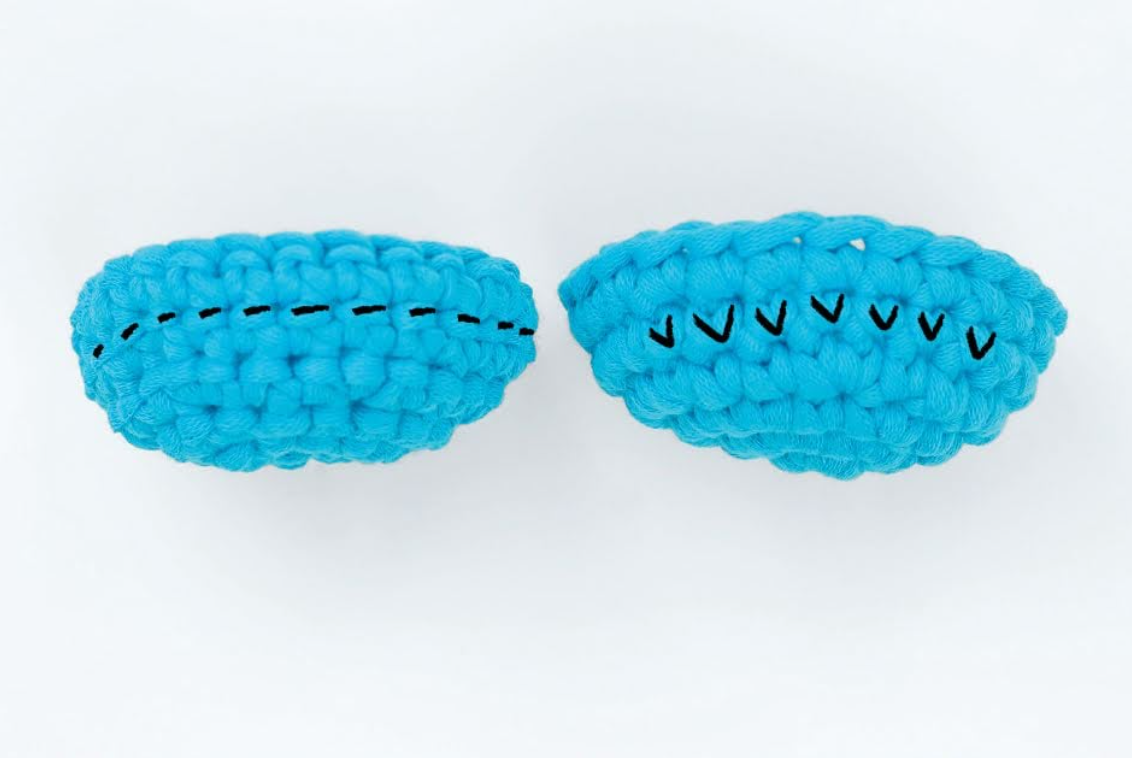
The wrong side has horizontal bars throughout the piece (left). The right side looks like a bunch of Vs (right).
Watch the video below for a demonstration on how to tell the right and wrong side of your crochet piece:
Telling the right side vs wrong side in crochet (step-by-step with photos)
When crocheting in a round, your piece will naturally curl at some point. The direction it naturally curls will make the wrong side face you. To make the right side face you, follow these steps:

1. Make sure the wrong side is facing you. The wrong side has horizontal bars.
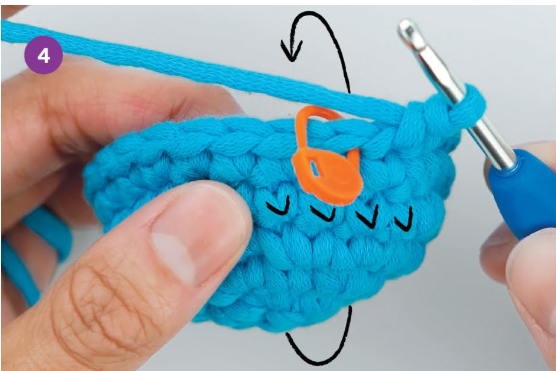
2. Push the middle of the piece until it flips inside out.
3. The right side will now be facing you, but your piece will be upside down. To make it easier to keep crocheting . . .
4. Rotate your piece until the open edge is on top of the piece, and the loop for the hook is on the side of the circle closest to you. The outside of your piece should now look like it’s made of vertical Vs.
TIP
Since it’s something that’s easy to forget to do, plus patterns don’t cue it, get in the habit of flipping your work as soon as possible to make the right side face out.
Still have questions?
Still have a question? See our FAQ or e-mail us.
Use stitch markers
How to use a stitch marker
Beginner crocheters are often guided towards working on projects that are crocheted in rows (i.e. scarves). However, here at The Woobles, we believe you might find it even easier to learn how to crochet by working in the round, since it means you never need to stop crocheting or turn your work around!
Crocheting in the round starts with crocheting a circle, and then working your way around the circle to build more rounds. It’s easy to lose track of where you are when crocheting in the round because, if things are going well, it should be impossible to tell where one round ends and another begins. Watch the video below for a demonstration on how to use crochet stitch markers to keep track of your rounds:
How to use a stitch marker to keep track of your progress (step-by-step with photos)
Always put a stitch marker under the top loops of the first stitch of your current round. Future you will be oh-so-grateful for a number of reasons:
- You’ll catch mistakes early on. Every time you finish a round, count the number of stitches in the round and make sure it matches the pattern. Use the stitch marker as the starting point for the count.
- When you lose count of your stitches, just start counting from the stitch marker to find your place again.
- When you inevitably make a mistake, undo your stitches up to the stitch marked by the stitch marker. (Otherwise, you’ll have to undo everything every time you make a mistake. And trust me, that’s no fun.)
So do future you a huge favor, and learn how to use stitch markers to properly keep track of your stitches.

1. Crochet the first stitch of the round.

2. Insert the stitch marker under both top loops of
the stitch you just made, and clip it closed like a
safety pin.

3. Crochet the rest of the round as you normally
would. When you’ve crocheted into the last hole
before the stitch marker, you’re done. Count the
number of stitches in the round, starting with the
one marked by the stitch marker. (Remember, the
loop on the hook does not count as a stitch.) If it
matches the pattern, then congrats! You can move
onto the next round.
TIP
Insert the stitch marker from the front to the back of the piece, with the open edge on the bottom. This way, you can use your thumb to help push the stitch marker open.
Still have questions?
What is a crochet stitch marker?
A crochet stitch marker is a small tool that helps you keep track of what round, row, or stitch you’re on in your crochet project. It’s an incredibly useful tool for crocheters.
Stitch markers can be anything from simple plastic pieces to paper clips, floss, safety pins, or even a differently colored piece of yarn. They’re typically attached to the first or last stitch in a row or round. This makes it easier for crocheters to identify which round or row they’re on without having to count manually, which can be confusing, frustrating, and time-consuming. Stitch markers also help keep count between pattern repeats and sections within those repeats.
What are stitch markers used for?
Crochet stitch markers can be used to show you where to repeat certain stitches, what round you’re currently on, or any other important reference points you want.
Some other creative uses of stitch markers: stitch markers can help you keep track of how many and what kind of stitches you should have in each row. Stitch markers also serve as placeholders when moving onto new sections while crocheting or if a pattern involves complex decreases and increases.
How do I place a stitch marker in crochet?
To use a crochet stitch marker properly, slip it under the horizontal V of the stitch you want to mark. At The Woobles, we use stitch markers to mark the first stitch of a round or row. People also commonly use stitch markers to mark where a pattern changes into a new section, such as if you were to change from doing double crochets to single crochets in your work-in-progress.
Still have a question? See our FAQ or e-mail us.
Crochet abbreviations
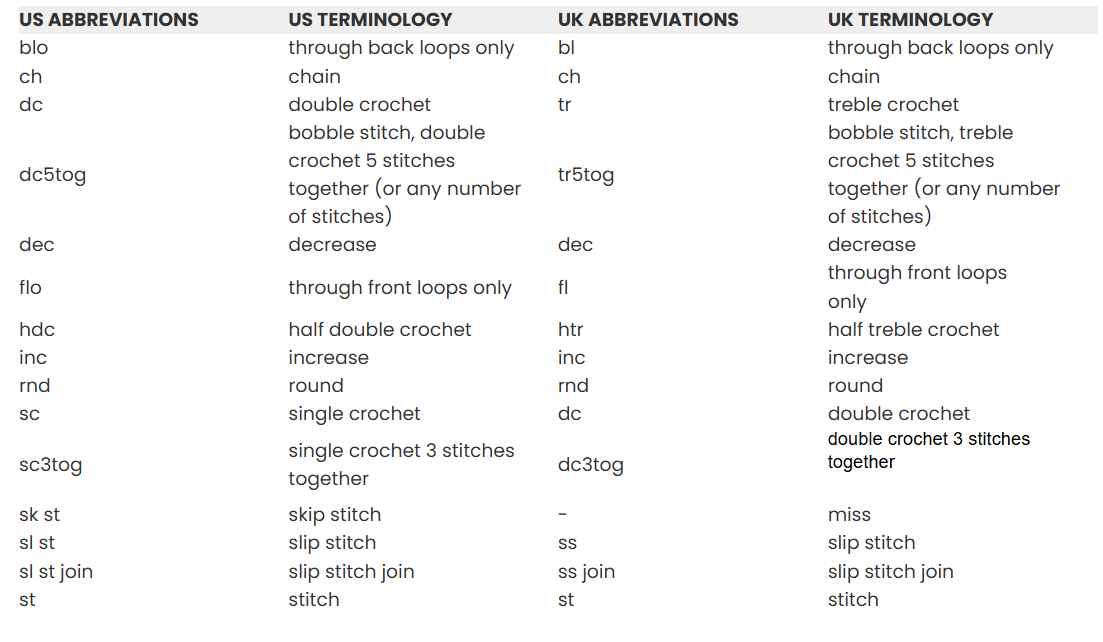
How to Read Crochet Abbreviations
At first glance, crochet patterns look like a foreign language. They use a lot of abbreviations and symbols, but once you get used to decoding them, they actually make it easier to read a pattern.
At first glance, crochet patterns look like a foreign language. They use a lot of abbreviations and symbols, but once you get used to decoding them, they actually make it easier to read a pattern.
Still have questions?
Still have a question? See our FAQ or e-mail us.
Read a crochet pattern
How to read a crochet pattern
At first glance, crochet patterns can look like a foreign language. That’s because they use a lot of abbreviations to save space, and make it easier to keep track of where you are in the pattern. Over time, you’ll begin to appreciate the brevity of crochet patterns and become a pro at reading them. There are really only 2 things you need to know when reading a crochet pattern:
1. What country are the crochet terms from?
Different countries have different words for the same stitches. For example, the British English term double crochet (dc), is actually the same term as the American English term single crochet (sc). As you may imagine, this can get confusing fast. Most patterns begin by defining which country’s terminology they use, as well as any abbreviations used. Here are some common abbreviations used in amigurumi written with US terminology:
yo: yarn over
rnd: round
2. How do you read crochet patterns?
Different crochet pattern designers use different formats to convey their instructions. This is also usually defined at the beginning of the pattern. You can expect that there will be repetition of stitches, which is probably the most confusing part to reading a pattern. Some patterns use brackets ((…), […]) or multiplier indicators (*, x), to convey which stitches you should repeat and for how many times.
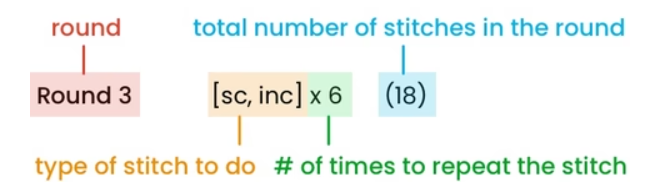
Crochet patterns by The Woobles are written in US terminology, and follow this format:
Rnd 3: [sc, inc]x 6(18)
This means that for round 3, repeat the sequence of [1 sc followed by 1 inc] a total of 6 times.
Which also could’ve been written as:
[sc, inc] [sc, inc] [sc, inc] [sc, inc] [sc, inc] [sc, inc]
Or with a lot more words:
[single crochet stitch in the first stitch, then 2 single crochet stitches in the next stitch] for a total of 6 times
(Are you starting to dig abbreviations yet? 😉)
Since 1 increase stitch = 2 single crochet stitches, 1 increase stitch counts as 2 stitches. 1 single crochet stitch counts as 1 stitch.
Therefore, that’s [3 stitches] repeated 6 times, for a final count of 18 stitches.
Yarn over
How to yarn over in crochet
Yarning over, abbreviated yo, is one of the basic building blocks of most crochet stitches. To create different types of stitches, it may be used before or after the hook is inserted into the piece, or multiple times per stitch.
How to yarn over (step-by-step with photos)
There are two ways to hold a crochet hook. Do what’s comfiest for you:
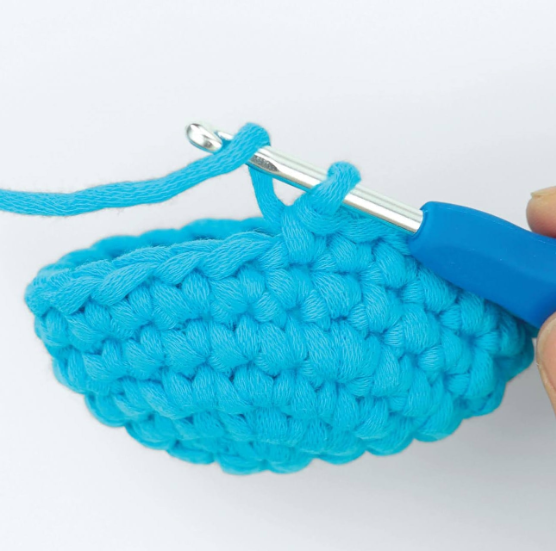
1. Position the hook in front of the yarn.

2. Bring the yarn from behind the hook to the front of the hook, over the top of the hook.
Still have questions?
What does yarn over mean in crochet?
Yarn over in crochet is a technique where you put your hook below and behind the working yarn. Abbreviated as YO in patterns, think of it as a building block for many stitches, like the single and double crochet stitches.
Do you have to turn to yarn over in crochet?
You don’t have to turn your work to yarn over. You can yarn over at any point in your work, whether you’re working in rows or in the round.
Still have a question? See our FAQ or e-mail us.
Crochet stitches
Slip stitch (sl st)
How to slip stitch (sl st)
The slip stitch (sl st) is one of the quickest stitches in crochet. It’s often used as part of the fasten off technique to finish a round crochet piece.
How to do a single crochet stitch (step-by-step with photos)
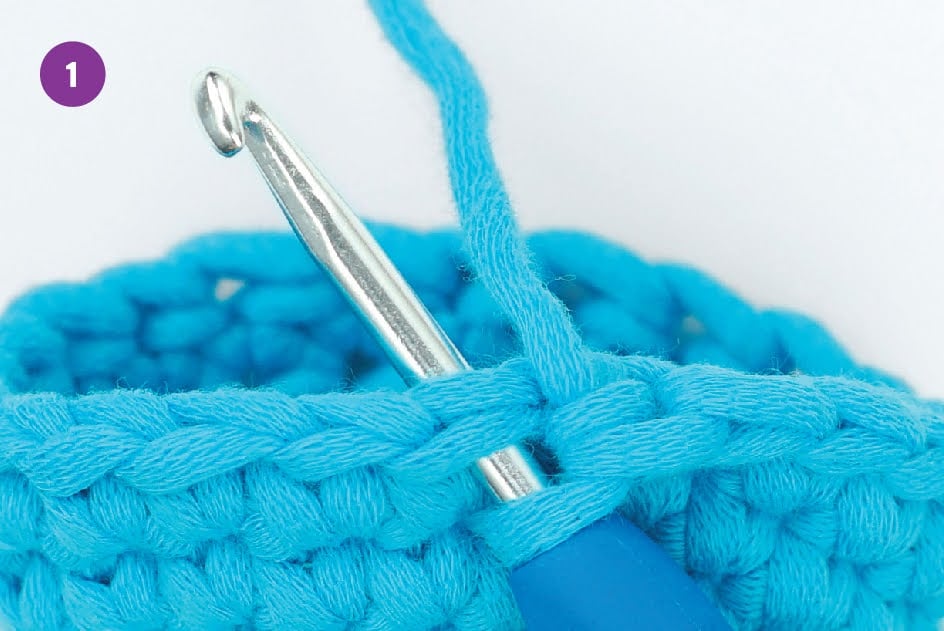
1. Insert the hook under the top loops of the next
stitch.

2. Yarn over. Pull the yarn through the stitch and
loop on hook to draw up a loop. There should be
one loop left on the hook.
Still have questions?
What is a slip stitch in crochet?
A slip stitch (sl st) in crochet is the shortest crochet stitch. It’s one of the quickest crochet stitches, and it can help improve the quality and overall look of your projects.
What is Easy Peasy yarn?
To join with a slip stitch:
1. Make a slip knot and put it on the hook. Insert the hook under the top loops of the stitch where you’ll be making the sl st join.
2. Yarn over. Pull the yarn through the stitch and loop on hook to draw up a loop. There should be one loop left on the hook.
Does a slip stitch count as a stitch in crochet?
Whether or not the slip stitch (often abbreviated as sl st) counts as a stitch depends on the pattern. If you’re working a round of only slip stitches, it counts as a stitch. But for example, if you’re crocheting in joined rounds, the slip stitch is used a stitch to connect the rounds and isn’t considered a stitch.
Still have a question? See our FAQ or e-mail us.
Single crochet (sc)
How to single crochet stitch (sc)
The single crochet stitch is the most basic crochet stitch, and is also the stitch used throughout most amigurumi – crochet softies. All other stitches are based on this one, so let’s work on your foundation!
How to do a single crochet stitch (step-by-step with photos)
1. Insert the hook under the top loops of the next
stitch.
2. Yarn over. Pull the yarn through the stitch and
loop on hook to draw up a loop. There should be
one loop left on the hook.

3. There should be two loops on the hook.

4. Yarn over. Pull the yarn through both loops on
the hook. There should be one loop left on the hook.
TIP
If your hook gets stuck when you pull through loops, try:
- Making looser loops
- Checking if you’ve caught some extra yarn fibers in the hook
- Pulling your hook in a direction more parallel to your work, to prevent your hook from getting snagged on something
- Rotating the tip of your hook to face the bottom of your piece as you pull it through the loops
Still have questions?
How do I count single crochet rows?
To count the number of rows worked in your crochet project, look for rows of V’s. Each row of V’s is a row. And each row of horizontal bars with upside-down V’s below the bars is also a row. Crocheted rows have these two different looks, because when crocheting in rows, you must turn the piece and crochet into both the front and back sides of the piece. So the horizontal bars with the upside-down V’s below them are what a row of stitches looks like from the back side.
It can be confusing to count rows, so to make things easier, try to keep a written tally of the number of rows you’ve crocheted so that you always know how many total rows you’ve done so far. You can also use stitch markers to help you know which row you’re on – you can mark the first stitch of every row, or every 10 rows, or whatever method works best for you.
Still have a question? See our FAQ or e-mail us.
Increase (inc)
How to single crochet increase
An increase stitch is two single crochet stitches in the same hole.It’s a great way to add extra stitches to your project. Increasing and decreasing the number of these stitches gives each amigurumi piece its unique shape.
How to crochet an increase stitch (step-by-step with photos)
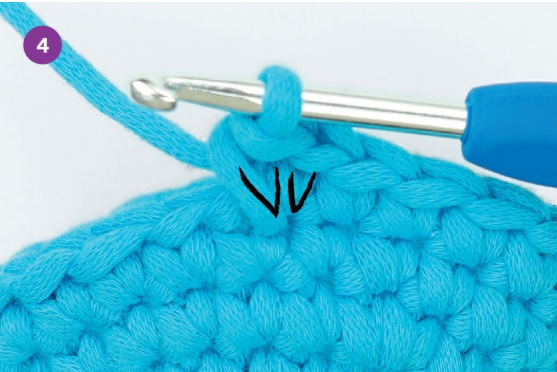
1. Make the first sc by following steps 1–4 of the single crochet stitch.
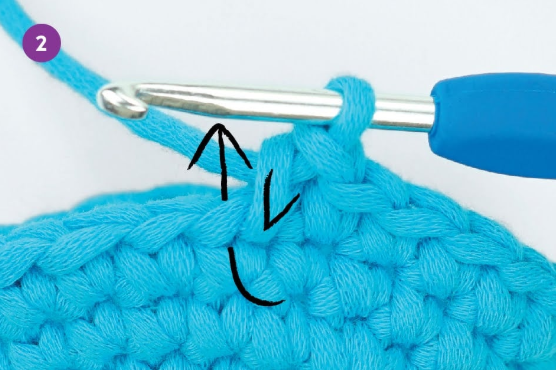
2. Look for the hole that the first sc went into. It’s the hole that the bottom of the vertical V you just made goes into.

3. Insert the hook into the hole.

4. Follow steps 2–4 of the single crochet stitch. The bottoms of the two vertical Vs you just made should trace back into the same hole.
TIP
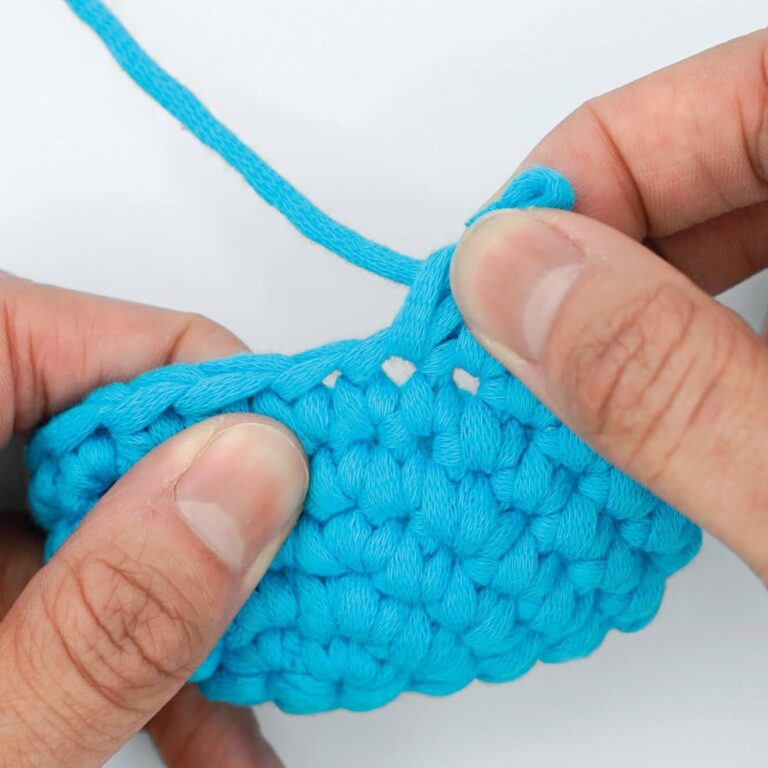
Having trouble figuring out what hole you just crocheted into? Do the “tugging method.” Hold onto the piece with your yarn hand and keep it steady. Hold the top loops of the stitch you just made with your right hand,and wiggle that hand around to see which hole shrinks and grows with the movement.

Still have questions?
What does a single crochet increase mean?
A single crochet increase, also known as a single crochet 2 together, is a basic technique used in crocheting. It’s the act of working two stitches in one hole to make a piece bigger.
Still have a question? See our FAQ or e-mail us.
Decrease (dec)
How to single crochet decrease
There are two ways to crochet a decrease stitch. When working in the round, do the invisible decrease stitch for a smoother finish. When working on a piece where both the “right” and “wrong” sides of the piece will be visible, do the regular decrease stitch.
How to do a regular single crochet decrease (step-by-step with photos)
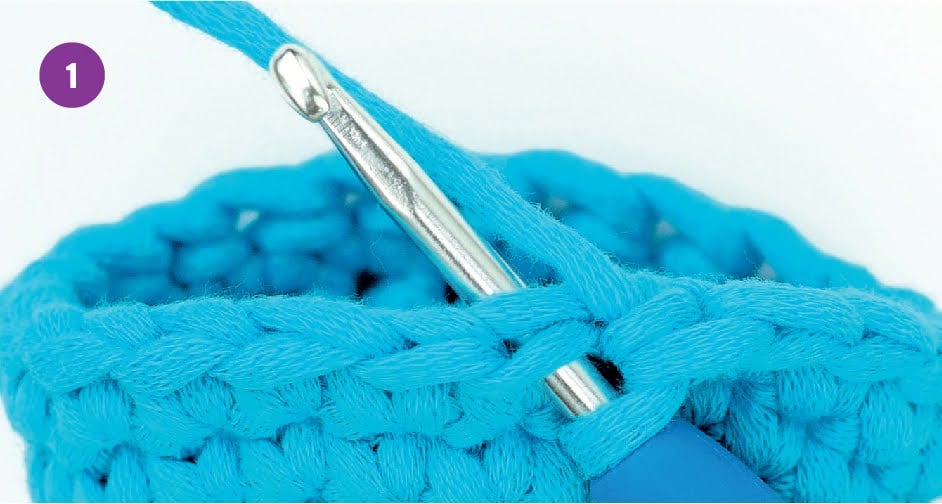
1.Insert the hook under the top loops of the next stitch.
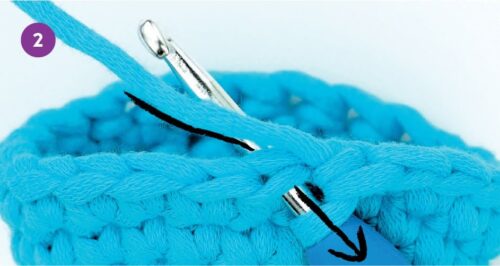
2. Yarn over. Pull the yarn through the stitch to draw up a loop.
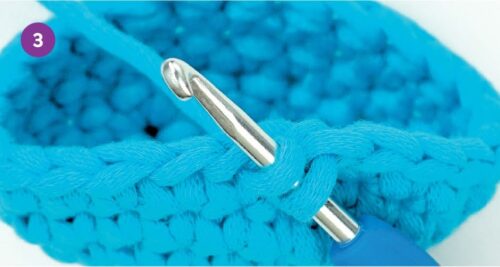
3. There should be two loops on the hook.

4. Insert the hook under the top loops of the next stitch.
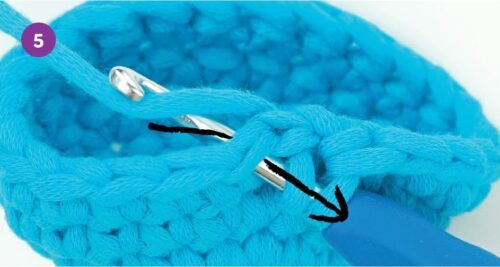
5. Yarn over. Pull the yarn through the stitch to draw up a loop.
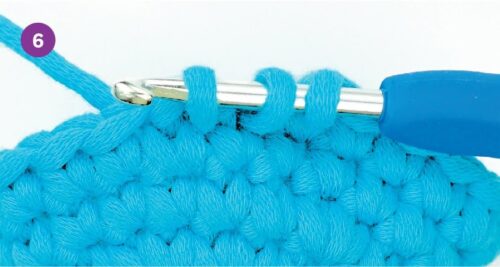
6. There should be three loops on the hook.

7. Yarn over. Pull the yarn through all three loops on the hook. There should be one loop left on the hook.
How to do an invisible single crochet decrease (step-by-step with photos)
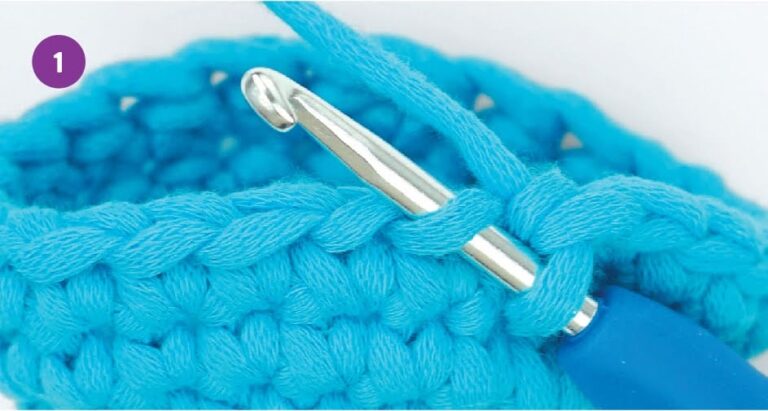
1. Insert the hook under the front loop of the next stitch
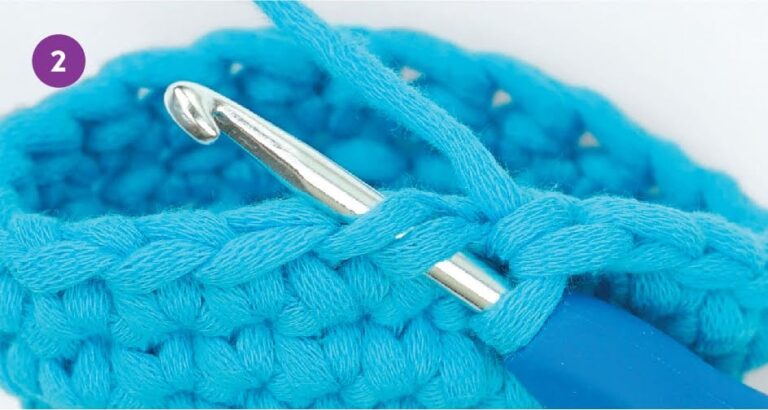
2. Insert the hook under front loop of the stitch after that.

3. Yarn over. Pull the yarn through both front loops to draw up a loop.

4. There should be two loops on the hook.

5. Yarn over. Pull the yarn through both loops on the hook. There should be one loop left on the hook.
TIP
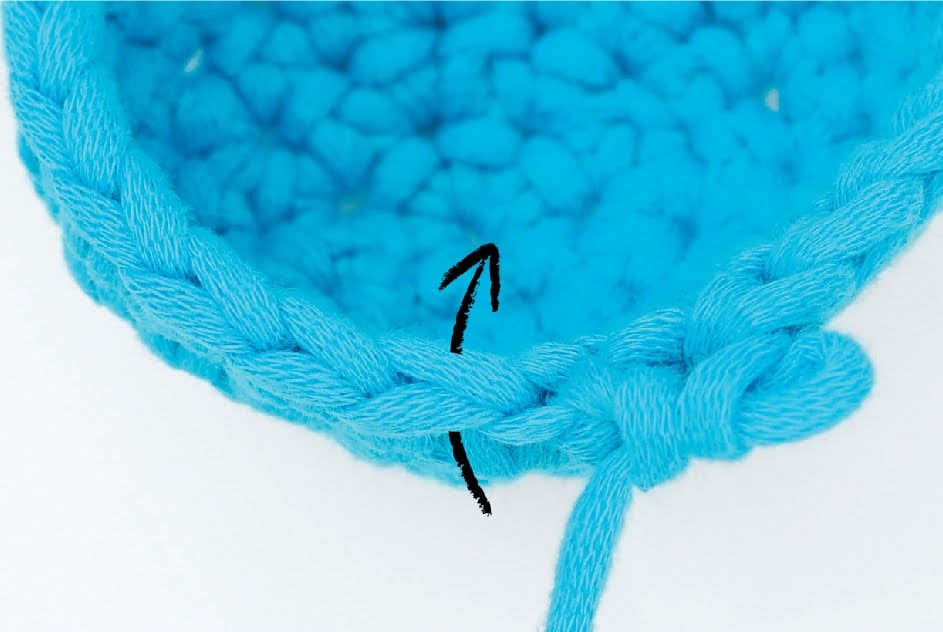
It can be tricky to see where to put the hook after a dec. The telltale sign is the front loop. If you see that the front loop of a stitch has been pulled, that’s part of the dec. The hook goes under the horizontal V next to that.
Still have questions?
What is a single crochet decrease?
A single crochet decrease (dec) is a way to make a crocheted piece narrower. It’s often used when decreasing the size of an item you are working on.
There are two types of decreases: a regular decrease and an invisible decrease. For amigurumi, an invisible decrease is preferred as it gives your creations a smoother finish.
Still have a question? See our FAQ or e-mail us.
Chain (ch)
How to crochet a chain stitch (ch)
The chain stitch (ch) is often used to increase the height of a new row, to create embellishments like hair for a doll, or to add a hole to a piece like to make a basket handle. If a chain stitch is the first stitch in a pattern,that’s your cue to make a “foundation chain”. The only difference between a foundation chain and a regular chain stitch is that it starts with a slip knot.
To make a chain stitch in crochet, yarn over. Pull the yarn through the loop on the hook. There should be one loop left on the hook.

TIP
Minimize the chance of twisting your chain by constantly moving your left hand to hold the chain as close as possible to the hook.
Still have questions?
How do I crochet into a chain stitch?
You’ve crocheted a chain, and to start a second row of single crochet stitches:
1. Insert your hook into the second chain stitch from the hook. You’ll want to put the hook under the just the side of the horizontal V further away from you, so it should look like you have two strands of yarn on the hook
2. Yarn over (YO) and pull the yarn through the chain stitch (two loops on hook)
3. YO and pull the yarn through both loops on the hook (first single crochet in second row made)
4. Keep going, inserting your hook into each chain stitch across the row and making a single crochet stitch in each one
How do I start a chain stitch in crochet?
First, make a slip knot. Then yarn over (another way of thinking about this is putting the hook below and behind the working yarn, with the tip of the hook facing you) and then pull the yarn through the loop on the hook. That’s one chain stitch done! Keep repeating that step to make as many chain stitches as you need. It may take a few tries to make every chain stitch the same size, but don’t worry, you’ll get the hang of it in no time!
How do I count chain stitches in crochet?
Each chain stitch makes a horizontal “”V”” shape. Count the number of V’s to count the number of chain stitches you have. You can also check out our step-by-step video tutorial on how to count stitches.
It’s also important to keep in mind that when you’re counting chain stitches, you shouldn’t count the slip knot that you made at the beginning of your chain as a chain stitch.
Still have a question? See our FAQ or e-mail us.
Turning chain (ch 1 & turn)
How to crochet a turning chain
Since crochet is always worked in one direction, once you’ve reached the end of a row, you’ll need to turn your work so that you can continue crocheting in that same direction. Watch this video to learn how to move onto the next row when crocheting a flat piece of single crochet stitches:
How to crochet a turning chain (step-by-step with photos)

1. Make a chain stitch.
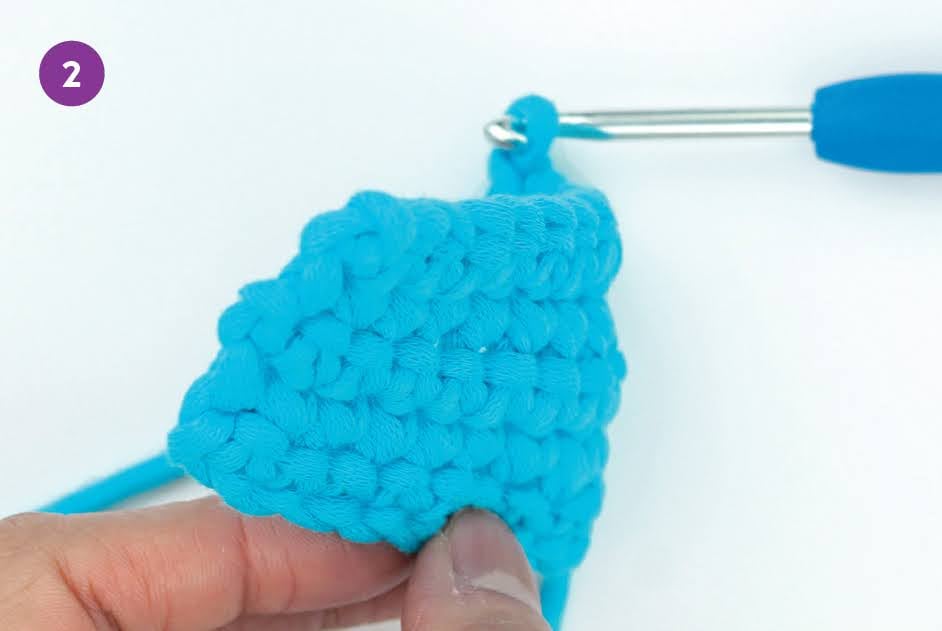
2. Flip your piece like the page of a book, until your piece is on the other side of the loop on the hook.
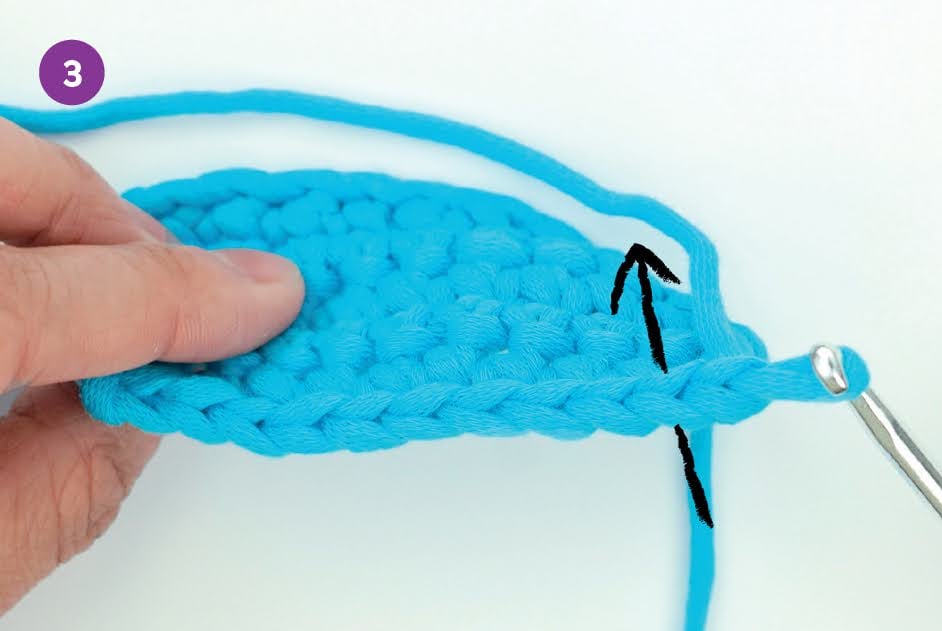
3. For the next stitch, put the hook under the top loops of the stitch two stitches away from the hook.
TIP
The ch in the “ch 1 and turn” is just there to add height to the row. It doesn’t count as a stitch, so it isn’t added to the total number of stitches in the row.
Still have questions?
Do you crochet into the turning chain?
No, usually you don’t crochet into a turning chain. It’s there to give height to a new row of stitches, which is why it usually also doesn’t count towards the number of stitches in a row. That said, depending on the pattern, you may be told to crochet into the back loop of the turning chain, or both loops. Sometimes the turning chain does count as a stitch depending on the pattern, so be sure to factor it in when counting your stitches.
How many turning chains do you make for double crochet?
For a row of double crochet stitches, you’ll need to start with 3 turning chains. This means that when you reach the end of a row of double crochet stitches, you’ll chain 3 before, or after, turning your work. Then you’ll be ready to start the next row.
How many turning chains do you make for single crochet?
For a row of single crochet stitches, you only need to make one chain to start a new row. This chain gives height to the new row and helps to create a smooth edge. When working with other stitches such as half double or double crochet, you’ll need two or three turning chains respectively.
Still have a question? See our FAQ or e-mail us.
Half double crochet (hdc)
How to half double crochet stitch (hdc)
The half double crochet stitch (hdc) is the halfway point between a single crochet (sc) and double crochet stitch (dc). Compared to a single (sc) stitch, it requires a yarn over before you insert the hook into a stitch, and requires you to pull the final yarn over through all 3 loops on the hook.
How to hold a crochet hook (step-by-step with photos)

1. Yarn over.
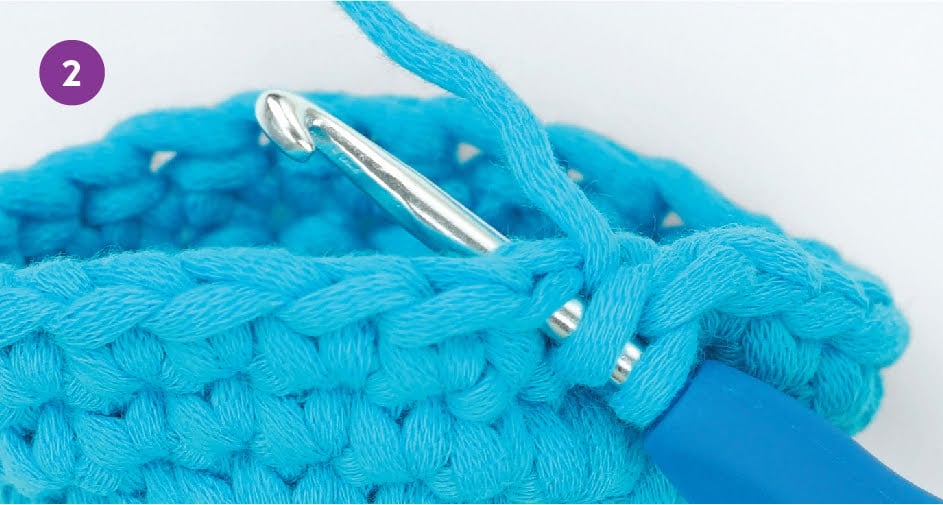
2. Insert the hook under top loops of the next stitch.

3. Yarn over. Pull the yarn through the stitch to draw up a loop.

4. There should be three loops on the hook.
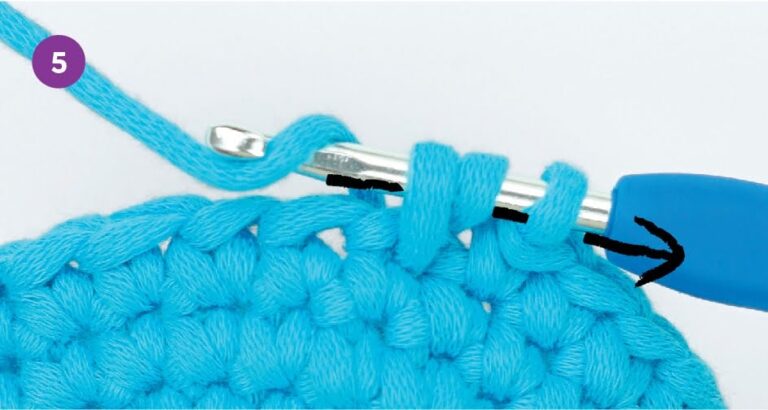
5. Yarn over. Pull the yarn through all three loops on the hook. There should be one loop left on the hook.
Still have questions?
What’s a half double crochet?
A half double crochet stitch (hdc) is one of the 6 basic crochet stitches and is the halfway point between a single crochet (sc) and double crochet stitch (dc).
How do I decrease half double crochet?
To decrease half double crochet:
1. Yarn over (YO), and insert the hook in the next hole, YO again, and pull the yarn through the same hole (three loops on hook)
2. YO and insert your hook into the next hole, YO, and pull the yarn through the same hole (five loops on hook)
3. YO and pull the yarn through all five loops
Still have a question? See our FAQ or e-mail us.
Double crochet (dc)
How to double crochet stitch (dc)
The double crochet stitch (dc) is double the height of the single crochet stitch (sc). Even though it sounds like more work, it just involves a few more yarn overs and pulling through loops. The reward? A crochet piece that works up more quickly than doing pure single crochet stitches.
How to double crochet (step-by-step with photos)
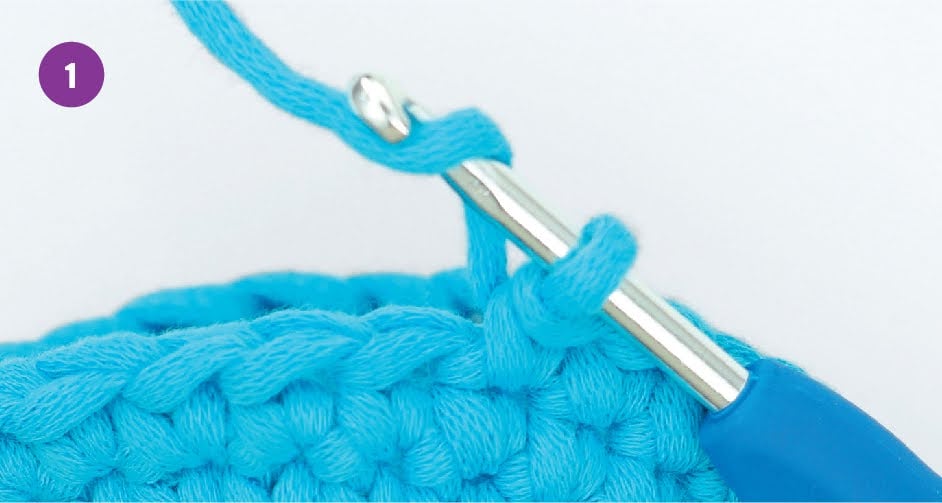
1. Yarn over.
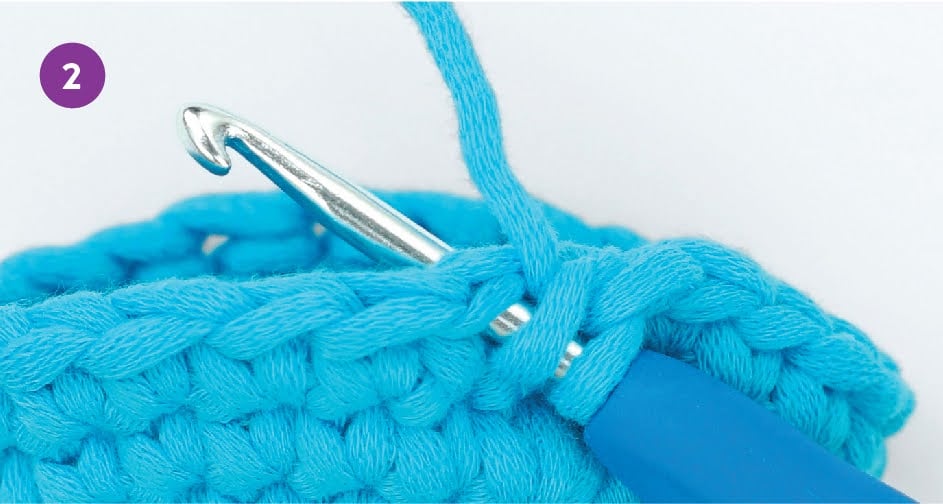
2. Insert the hook under the top loops of the next stitch.

3. Yarn over. Pull the yarn through the stitch to draw up a loop.

4. There should be three loops on the hook.

5. Yarn over. Pull the yarn through only the first two loops on the hook.
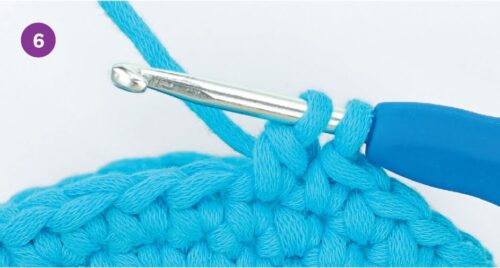
6. There should be two loops left on the hook.
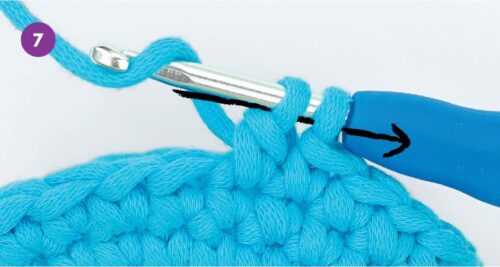
7. Yarn over. Pull the yarn through both loops on the hook. There should be one loop left on the hook.
Still have questions?
What does double crochet mean?
A double crochet stitch (dc) is a basic crochet stitch that’s double the height of the single crochet stitch (sc). It’s a versatile stitch that can be used to create different textures and shapes in your projects.
How do I decrease double crochet?
To decrease when double crocheting:
1. Yarn over (YO), insert your hook into the next hole, YO, and pull the yarn through the same hole (three loops on hook)
2. YO and pull the yarn through the first two loops on your hook (two loops on hook)
3. YO, insert your hook into the next hole, YO, and pull the yarn through the same hole (four loops on hook)
4. YO and pull the yarn through the first two loops on your hook (three loops on hook)
5. YO and pull the yarn through all three loops on your hook
Here’s a step-by-step guide on how to decrease double crochet.
Still have a question? See our FAQ or e-mail us.
Bobble stitch (dc5tog)
How to bobble stitch (dc5tog)
The bobble stitch is created by crocheting 5 double crochet (dc) stitches together, which is why it’s sometimes abbreviated as dc5tog. Watch the video for a demo:
How to hold a crochet hook (step-by-step with photos)
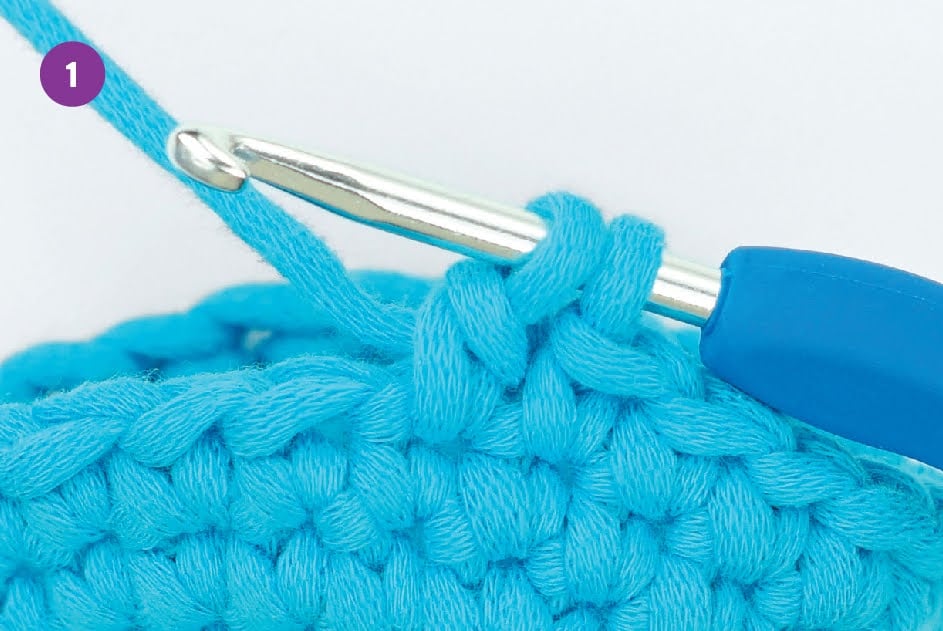
1. Do a double crochet stitch so that there are two loops left on the hook. You’ve completed the first dc of five.

2. Yarn over.
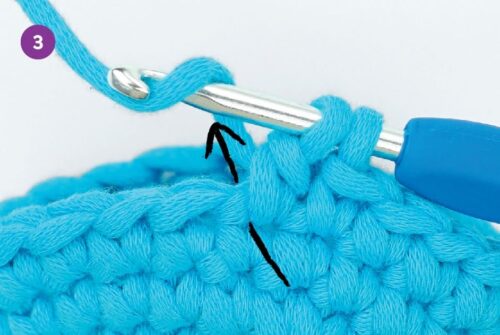
3. Insert the hook in the same hole that the first dc went into.
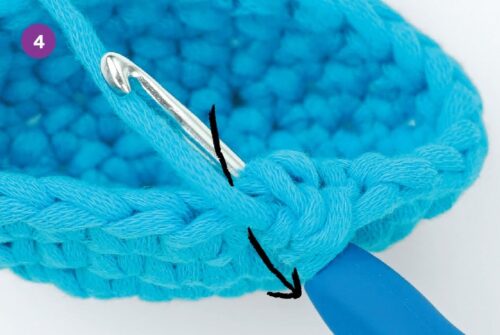
4. Yarn over. Pull the yarn through the stitch to draw up a loop.

5. There should be four loops on the hook.

2. Yarn over.

7. There should be three loops left on the hook.

8. Repeat steps 2–6 three more times, until you have six loops on the hook.
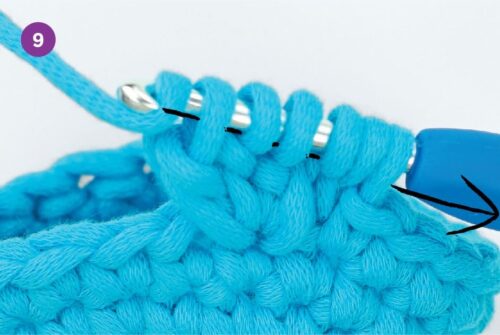
9. Yarn over. Pull the yarn through all six loops on the hook.
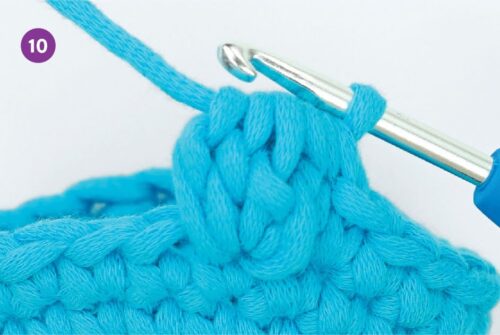
10. There should be one loop left on the hook. Make sure the final bump faces the outside of your work
TIP
If you need to double crochet together a different number of stitches, just change the number of times you repeat steps 2–7. You want to end with one more loop on the hook than the number of dc you’re crocheting together. For example, to dc4tog, stop when you have five loops on the hook.
Still have questions?
What is a bobble stitch in crochet?
A bobble stitch in crochet is a fun and textured stitch that creates little “bobbles” or raised bumps in your crochet work. It’s made by crocheting 5 double crochet (dc) stitches together (dc5tog). It’s a bit more advanced than basic stitches, but once you get the hang of it, it can add a lot of visual interest to your crochet projects. It’s often used in making textured fabrics and decorative items.
Can you combine bobble stitch and single crochet stitch?
You can definitely combine the bobble stitch and single crochet stitch in your crochet projects. The bobble stitch adds texture to your work and the single crochet stitch can be used to create a smooth and even fabric. By using these stitches together, you can create a unique and interesting design. You can alternate between the bobble stitch and the single crochet stitch in a row or pattern, or you can use the bobble stitch as an accent to single crochet stitches. The possibilities are endless! It’s all about your creativity. You can try different combination and see what works best for you and your project.
Still have a question? See our FAQ or e-mail us.
Single crochet 3 together (sc3tog)
How to single crochet 3 together (sc3tog)
Techniques
Undo stitches
How to undo stitches in the round
Everyone makes mistakes and luckily, crochet is very forgiving. Maybe you’ve forgotten where you’re at in a pattern, or the number of stitches in the round doesn’t match the pattern, or you simply think your crochet piece could look better. Whatever the reason, it’s very easy to undo crochet stitches, and if you use a stitch marker to mark your rounds, it’s also easy to troubleshoot as well. The tutorial below shows you how to safely undo your stitches so that you always know where you are.
How to undo crochet stitches(step-by-step with photos)
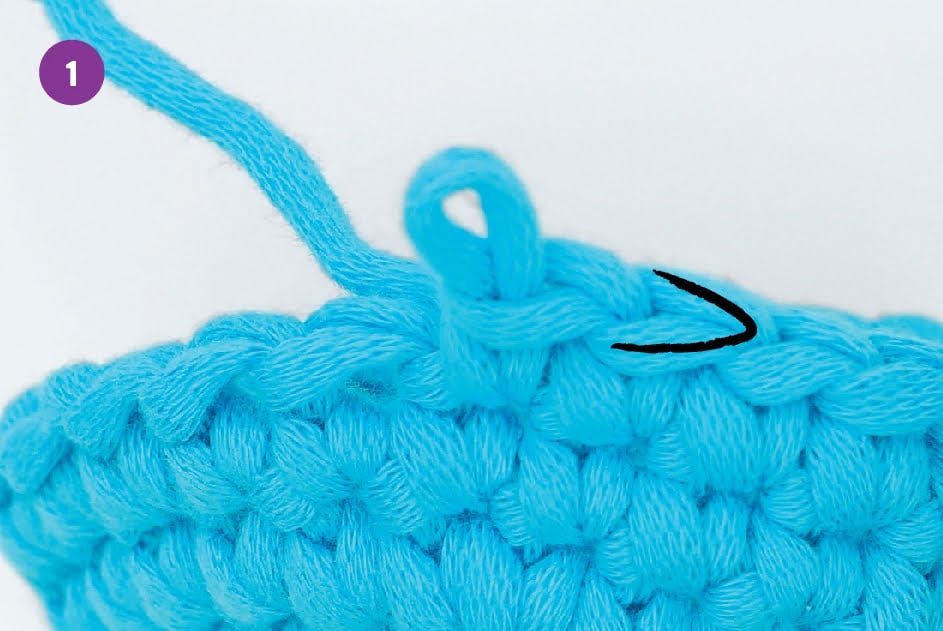
1. Identify the stitch you want to keep.
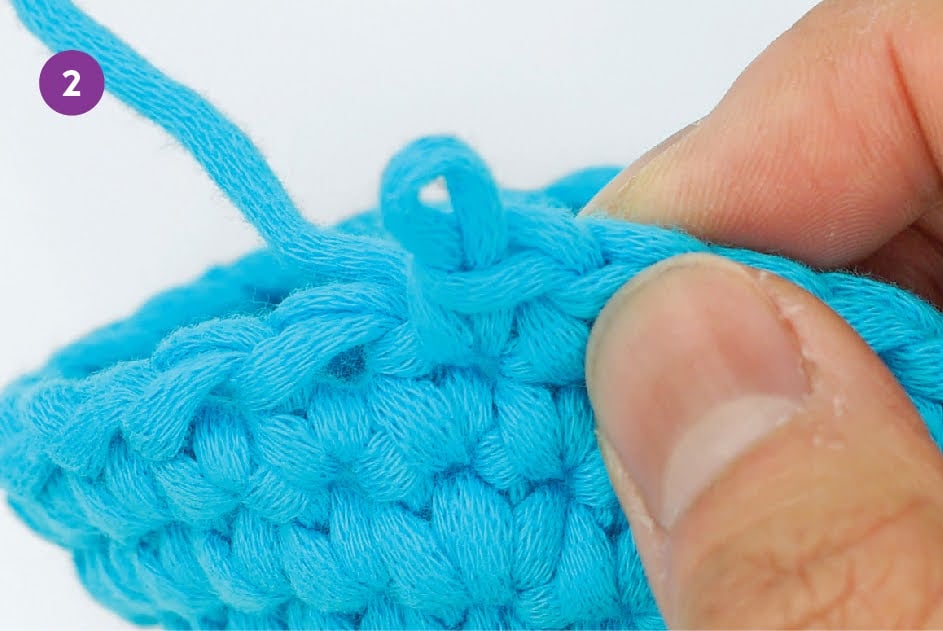
2. With your right hand, hold onto the top loops of the stitch you want to keep.
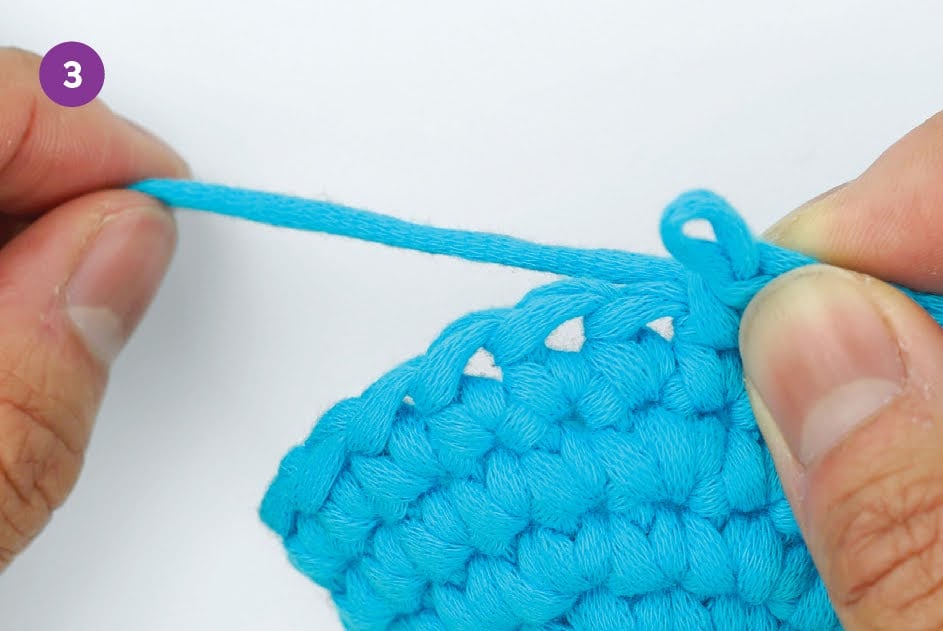
3. With your left hand, slowly pull on the working yarn until the only loop left is the loop coming out of the stitch you want to keep.
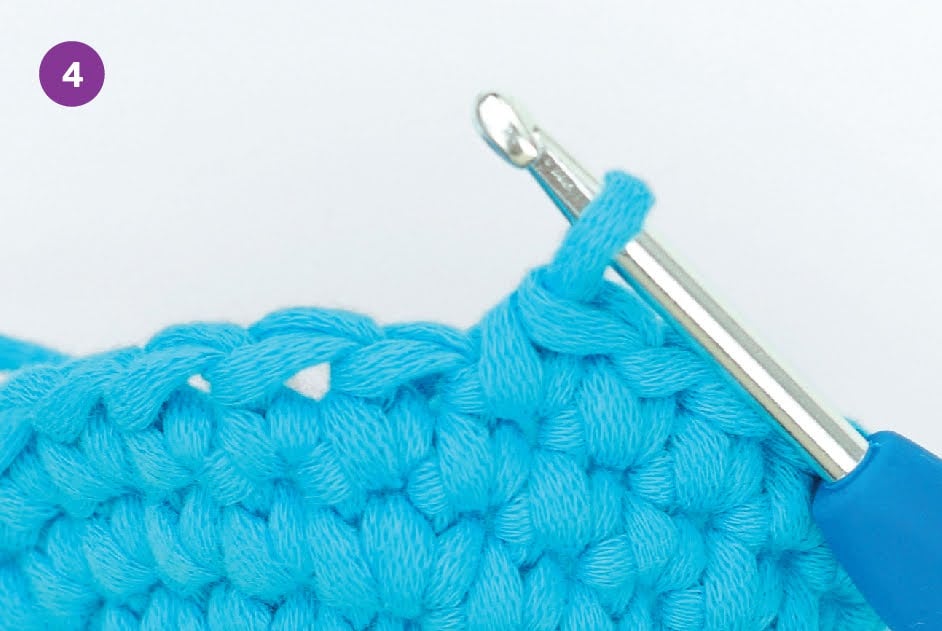
4. Put the hook in this loop to continue crocheting.
TIP
When you first feel a stitch coming undone, you’ll probably be left with at least two loops. This means you haven’t undone the whole stitch yet! Keep pulling until you only have one loop left. That loop should come out of the stitch you want to keep.


Still have questions?
Still have a question? See our FAQ or e-mail us.
Magic ring
How to make a magic loop
A magic loop, also called a magic ring, magic circle, adjustable ring, or adjustable loop, is the preferred way to start crocheting in the round. It’s considered magical because the result has no hole in the middle.
However, the magic loop can be tricky to master so if you’re having a lot of trouble with it, you can start a round piece with a chain instead.
Making the magic loop step-by-step (with photos)

1. Turn your left palm to face you. Hold the yarn tail in your right hand and place the yarn in front of your left palm.
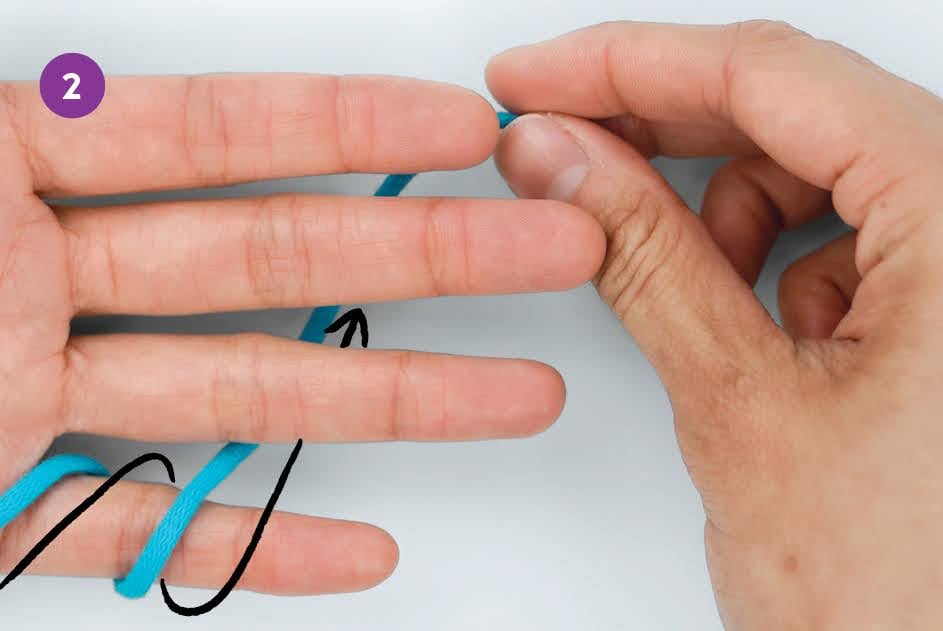
2. Wrap the working yarn once around your pinky, so that the yarn tail ends up behind your hand.

3. Bring the yarn tail up the back of your hand until you can drape it over your pointer finger.

4. Loop it once around your pointer finger, so it crosses in front of your finger.

5. Hold onto the intersection with your left thumb and slide the loop off your finger using your right hand.
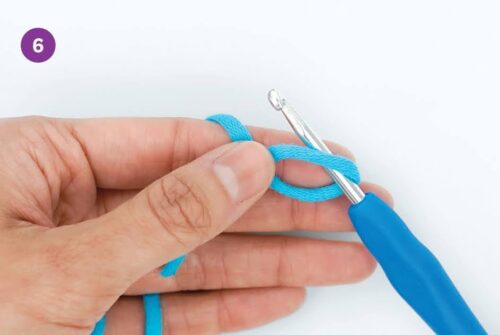
6. Insert the hook through the middle of the loop, from the front to the back.

7. Rotate the hook so the tip is facing away from you, and grab onto the working yarn.

8. Pull the working yarn back through the loop, while rotating the hook so that the tip faces you again, to draw up a loop. If you need more tension in the working yarn, move your middle finger away
from you.

9. The hook should be in front of the working yarn.

10. Yarn over. Pull the yarn through the loop on the hook. There should be one loop left on the hook.
TIP
You just made a chain stitch in step 10. This does not count as a sc in the magic loop.
If you can let go of the magic loop and everything stays intact, you’ve done it correctly. Huzzah!
Single crochet in a magic ring (step-by-step with photos)
Now that you have a magic loop you can safely let go of, feel free to rearrange your grip to however you normally hold yarn.
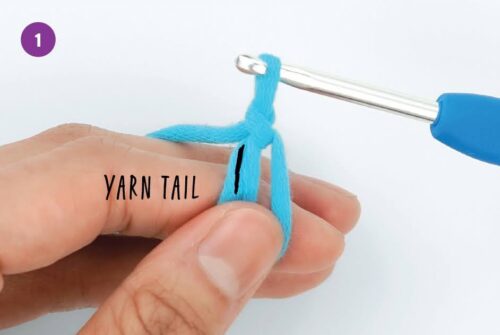
1. With your left hand, hold onto both the left and right sides of the magic loop and the yarn tail. Keep the yarn tail on the left side of the magic loop.
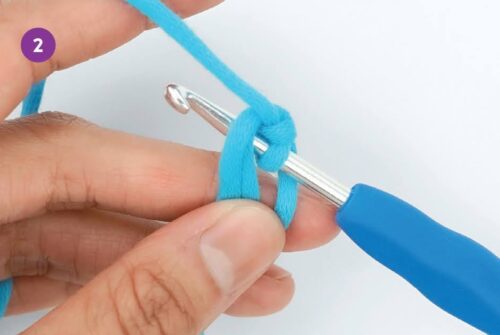
2. Insert the hook through the middle of the loop, from the front to the back. The hook should look like it’s under the left side of the loop and the yarn tail.
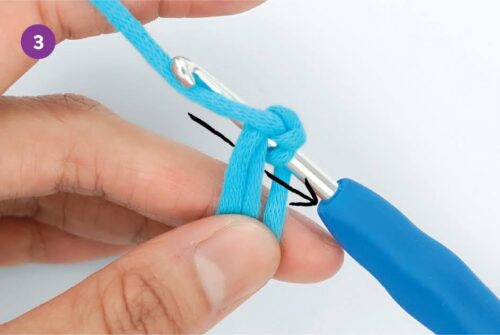
3. Yarn over. Pull the yarn back through the loop, under both the left side of the loop and the yarn tail, to draw up a loop.

4. There should be two loops on the hook.
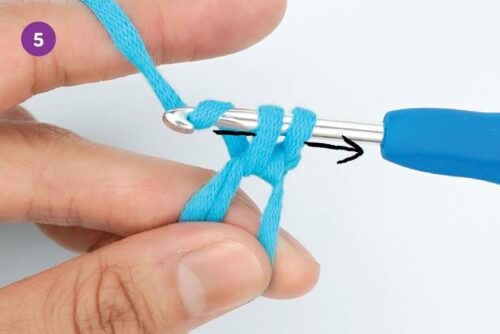
5. Yarn over. Pull through both loops on the hook. There should be one loop left on the hook. This completes one sc.
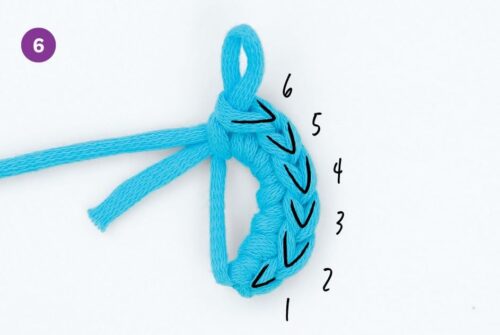
6. Repeat steps 2–5 until you have as many sc as the pattern calls for.

7. When you’re done, put the hook down. With your right hand, hold onto the top loops of the stitches you just made. With your left hand, pull on the yarn tail until the magic loop disappears.

8. To start the next round, put the hook under the top loops of the stitch to the left.
TIP
Make it easier to find the first stitch of the magic loop later, by putting a stitch marker under the top loops of this first stitch the moment you make it.

Still have questions?
What’s a magic loop in crochet?
A magic loop in crochet, also known as a magic circle or magic ring, is a technique used to create a small, adjustable loop of yarn that can be used instead of a traditional chain loop. The magic loop is a popular way to begin amigurumi because it’s the only method to begin a round piece that guarantees no hole.
Can you start a magic loop in double crochet?
Yes, you can start a magic loop and put double crochet stitches in it. Start by making a loop around your fingers like normal. Once you have a circle, instead of chaining 1 as you’d do with a single crochet magic circle, chain 3. This chain-3 counts as your first double crochet. After you do that, continue double crocheting into the circle until you have the desired number of stitches.
Still have a question? See our FAQ or e-mail us.
Start round piece with a chain
Start a round piece with a chain
In this tutorial, you’ll learn two ways to start a round piece using the chain method. This method is an alternative if the magic loop or magic ring is giving you trouble..
This tutorial shows you how to start crocheting in the round using the chain 2 (ch 2) method. This is an alternative to the magic ring, and it’s perfect for beginners.
Slip knot
How to make a slip knot
The slip knot is one of the most basic and versatile knots used in knitting, crocheting, and other yarn crafts. It’s a great way to start any project as it can be easily undone and adjusted if needed. A slip knot is also known as a running knot and is used for many different purposes. In this video tutorial, you’ll learn how to make a slip knot.
1. Lay the yarn out horizontally on a table, with the yarn tail on the right.
How to make a slip knot (step-by-step with photos)

1. Lay the yarn out horizontally on a table, with the yarn tail on the right.

2. Cross the yarn tail over the working yarn.

3. Pick up the right side of the loop and flip it over the crossing point. The working yarn should be behind the middle of the loop.

4. Pick up the working yarn in the middle of the loop with your right hand.
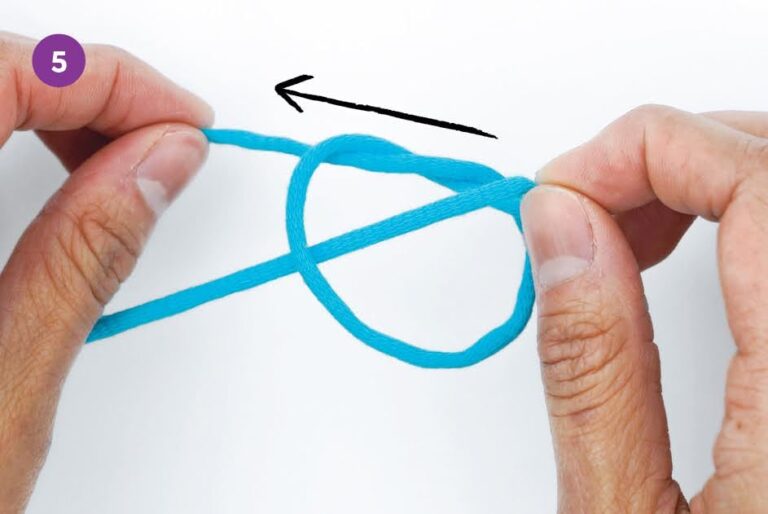
5. Pull on the yarn tail with your left hand until a slip knot forms.
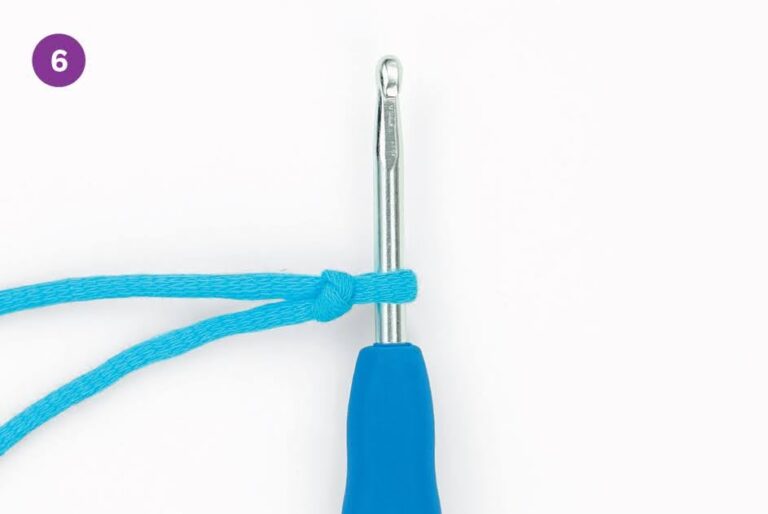
6. Put the loop on the hook, with the knot to the left of the hook. Pull on the working yarn to make the loop smaller.
Still have questions?
Does the slip knot count as a stitch in crochet?
No, the slip knot doesn’t count as a stitch in crochet. A slip knot is generally used as the starting point for any crochet project. It’s simply a type of loop that you can pull on to tighten around your hook or needle. You can think of it like a “pre-stitch” when beginning your work, but ultimately it doesn’t actually count towards your finished project or any part of the pattern itself.
Still have a question? See our FAQ or e-mail us.
Crochet in rows
How to crochet in rows
Crochet in rows to make flat pieces, like scarves or blankets. In the video below, we’ll cover the following steps to get you started crocheting in the round:
How to crochet in rows (step-by-step with photos)
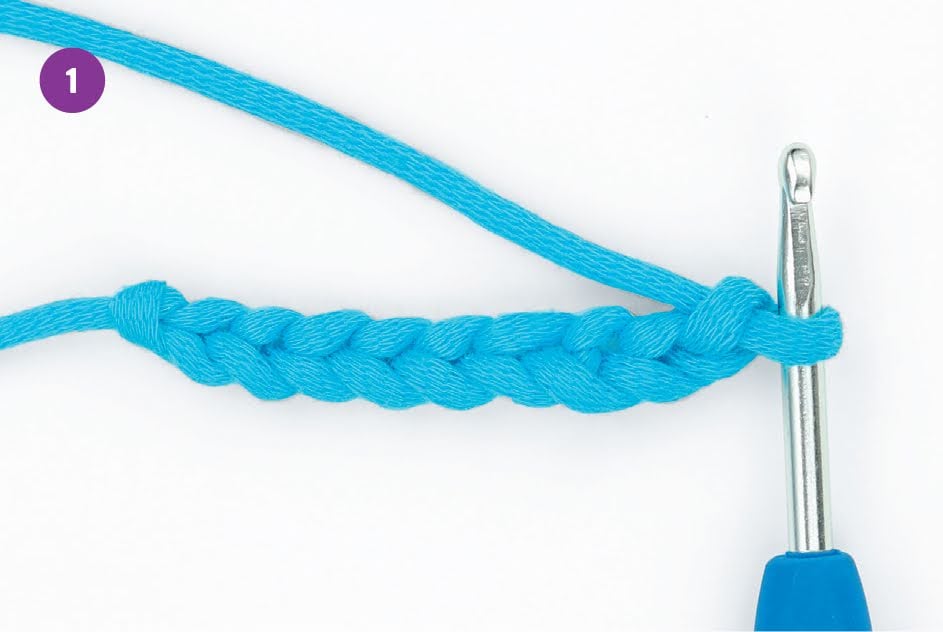
1. Crochet a foundation chain.
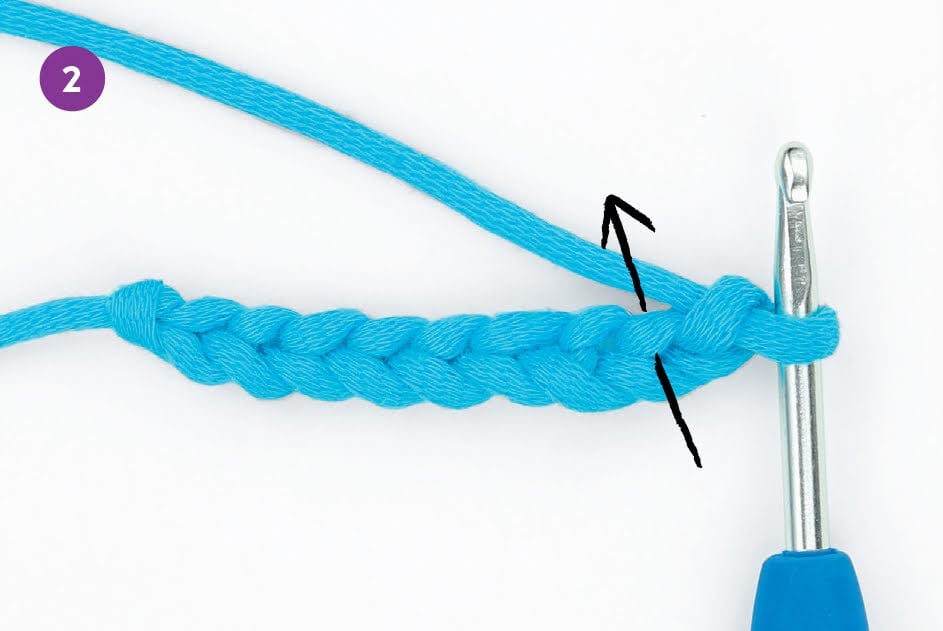
2. To start the next row, skip the first ch from the hook, unless otherwise written. Insert the hook under the back loop of the second ch from the hook.

3. Crochet all stitches of this second row through the back loops of the foundation chain.
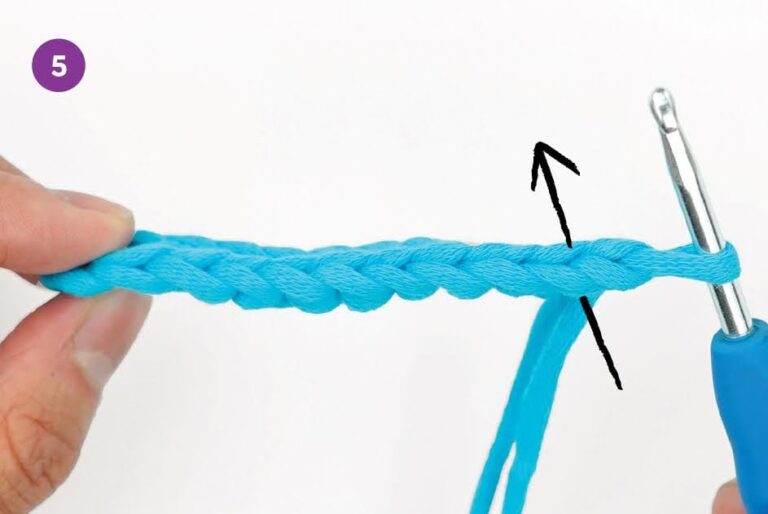
4. When you reach the end of the row, ch 1 and turn.
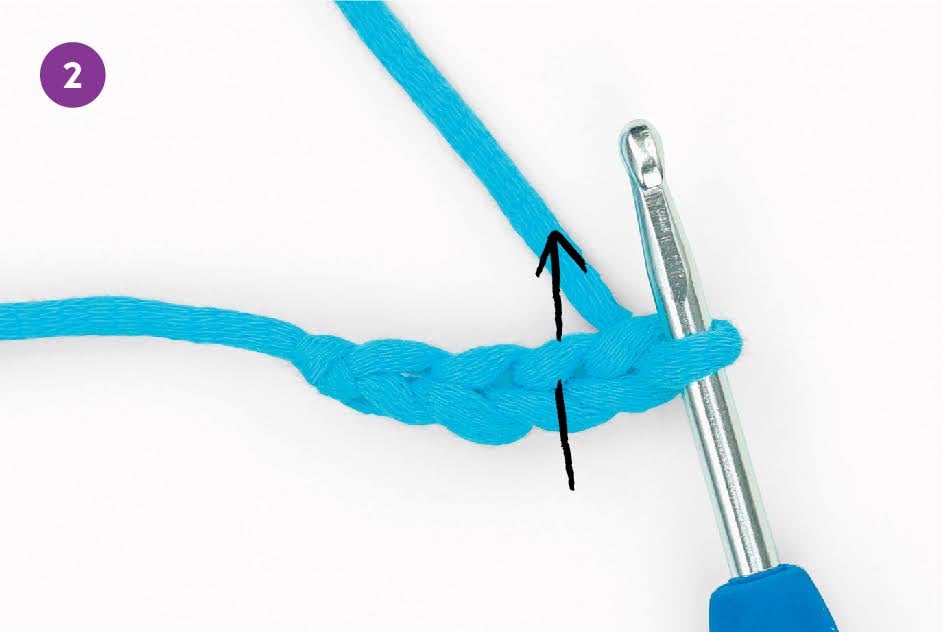
5. Remember that the first stitch of a new row gets crocheted into the second stitch from the hook. The hook should also go under both top loops of the previous row.

6. Repeat steps 4-5 until you finish the pattern.
Still have questions?
How do I start a second row in crochet?
To start a second row in crochet, you just need to flip your work like the page of a book so that you can keep on crocheting into the previous row of stitches. To make the next single crochet row, chain 1, insert your hook into the second chain from the hook, and complete one single crochet. Then keep going and make a single crochet in each chain all the way across.
How do I count rows in crochet?
To count the number of rows worked in your crochet project, look for rows of V’s. Each line of vertical V’s is a row. And each line of horizontal bars with upside-down V’s below the bars is also a row. Crocheted rows have these two different looks, because when crocheting in rows, you must turn the piece to keep on crocheting into both the front and back sides of the piece. So the horizontal bars with the upside-down V’s below them are what a row of stitches looks like from the back side. Have a look at our step-by-step video tutorial, which takes you through how to count rows.
If you’re working on a pattern, it’s a good idea to keep track of the number of rows you’ve completed, so you can make sure you’re on track with the pattern. Some people like to use a row counter or mark up a piece of paper each time they finish a row. You can also use stitch markers to help you know which row you’re on. Whatever works best for you!
Still have a question? See our FAQ or e-mail us.
Crochet an oval
How to start an oval in crochet
If a pattern tells you to rotate your foundation chain and crochet on the other side of the chain, that’s code for: crochet an oval.Crocheting an oval involves crocheting on both sides of a foundation chain and putting multiple single crochet stitches at the ends of the chain. It can be tricky to see where to put your hook in the foundation chain, so watch the video below for a demo:
How to crochet an oval (step-by-step with photos)

1. Crochet a foundation chain with as many ch as the pattern calls for.
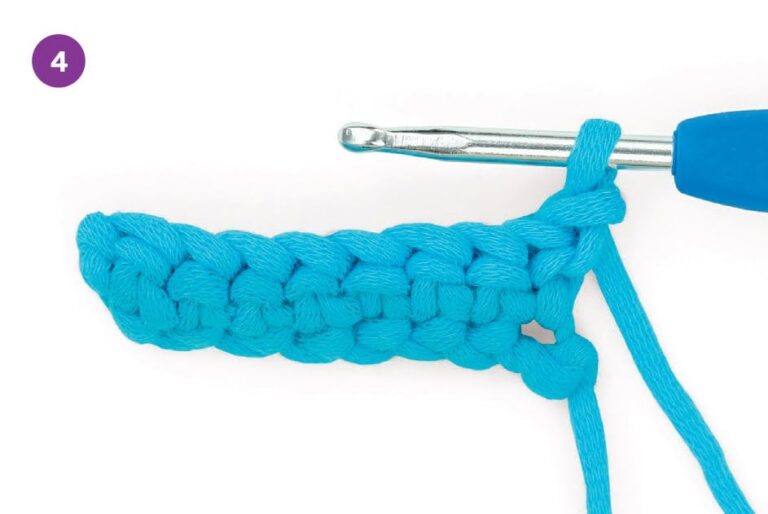
2. Follow the pattern’s instructions for the next row. Remember that the first sc goes under the back loop of the second ch from the hook, and that all stitches in a foundation chain go through the back loops only.

3. At some point, the pattern will tell you to crochet a bunch of stitches in the last stitch of the foundation chain, and then rotate the piece so you
can work on the other side of the foundation chain. Rotate the piece clockwise, until the other side of the foundation chain is facing up.

4. Crochet the rest of the round under the unWworked front loops of the foundation chain.
An oval with 4 foundation chain stitches
This is what an oval that started with 4 ch looks like.
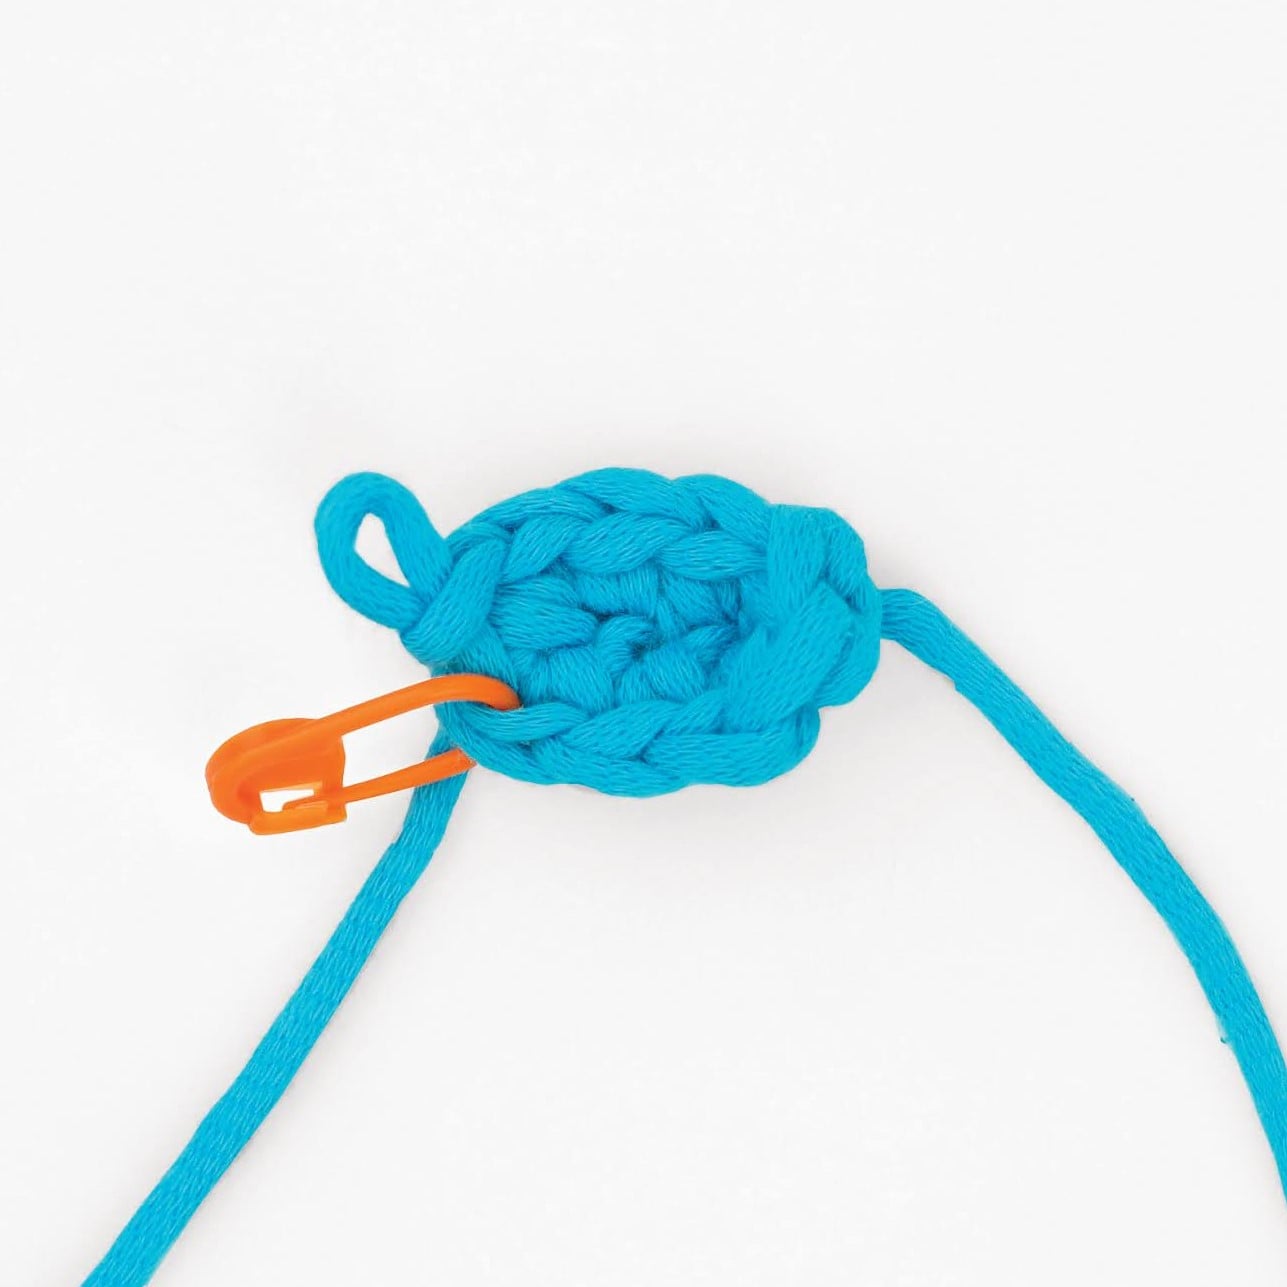
TIP
To help you stay oriented, put a stitch marker under the first sc.
Still have questions?
Still have a question? See our FAQ or e-mail us.
Change colors
How to change colors in crochet
Adding color to your crochet projects can be a great way to make them stand out. Whether you’re looking to add a few stripes or create an intricate design, changing colors in crochet is an essential skill. In these tutorials, we’ll show you how to change colors in crochet and provide some helpful tips for achieving the perfect look.
Want to make the jump between the two different colors a little less noticeable? Do a slip stitch for the first stitch in the other colors instead of a single crochet stitch, like in this video.
Changing colors in the round (step-by-step with photos)
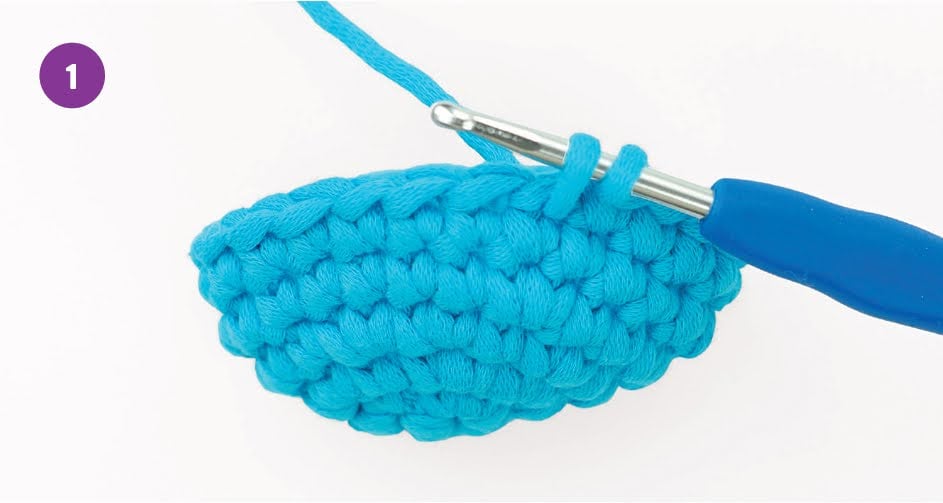
1. For the stitch before the pattern says to switch colors, crochet it like normal until right before you get to the last yarn over. In this example, the stitch before the color change is a sc, so pause when you have two loops of color A on the hook.
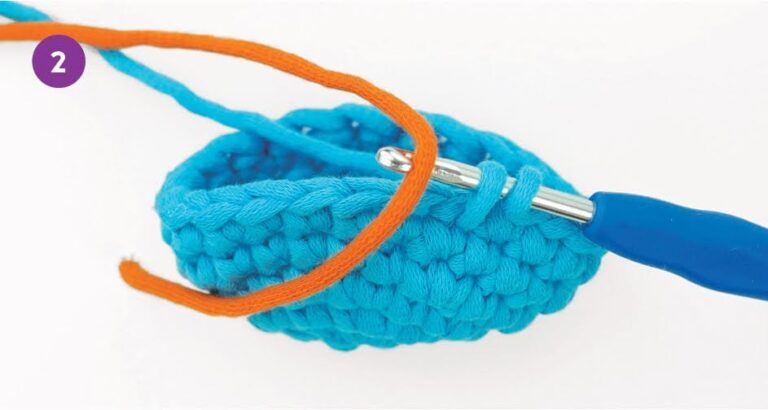
2. Take color B and drape it on the hook. Leave at least a 6-inch yarn tail. The yarn tail should be on the side of the hook closer to you.

3. Pinch the yarn with your left hand to help give it enough tension so you can pull color B through the loops on the hook.
TIP
If this made the last loop of color A too big, pull on color A’s working yarn.
Changing colors in the round (step-by-step with photos)
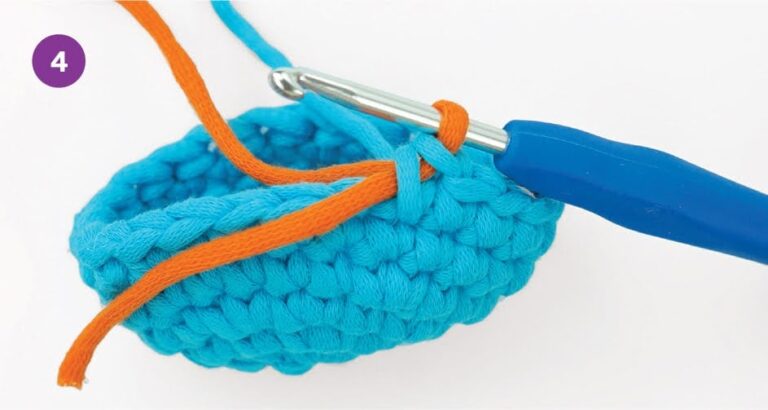
4.There should be one loop of color B left on the hook.
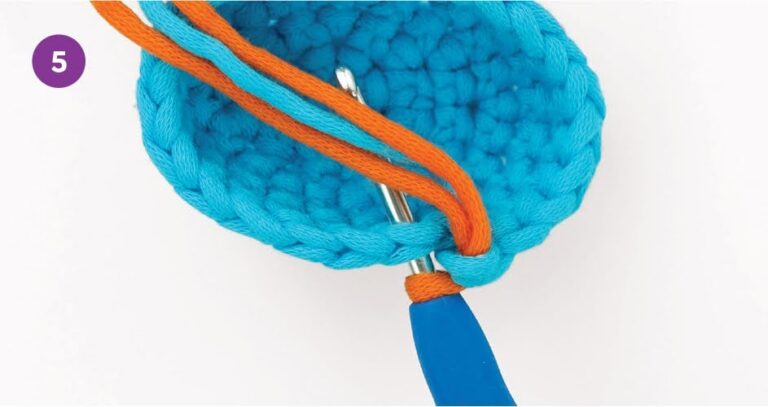
5. Insert the hook under the top loops of the next stitch, plus color A’s working yarn and Color B’s tail.

6. Crochet the stitch written in the pattern like normal, using color B’s working yarn. Every time you’re
supposed to yarn over and pull the yarn through a stitch to draw up a loop, remember to pull the working yarn under any unused yarn and through the stitch.
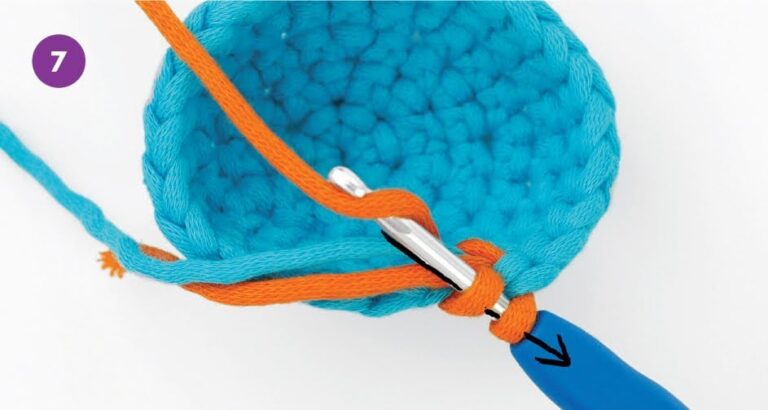
7. Every time you’re supposed to yarn over and pull the yarn through loops on the hook, remember to do this above the unused yarn.

8. For at least the next 10 stitches, keep crocheting over color A’s working yarn and color B’s tail.

9. If you’re going to use color A in the same or next round, keep crocheting over it. If not, cut it as close to the piece as possible.

10. To switch back to color A, crochet the stitch before the pattern says to switch colors, and pause before you do the last yarn over.

11. Yarn over with color A. Pull color A through the loops on the hook so you’re left with one loop of color B.
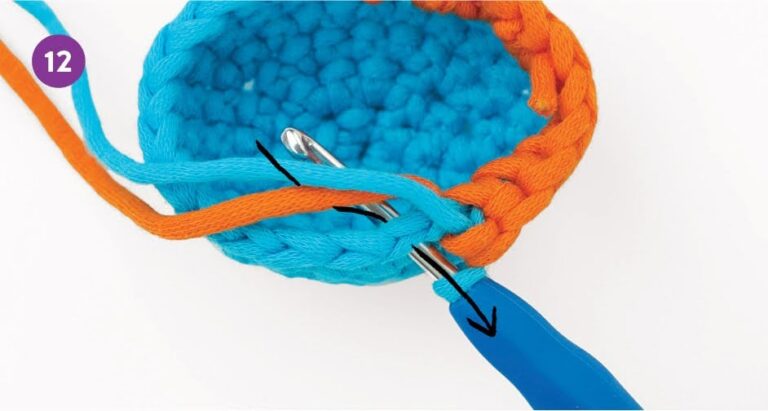
12. Continue following the pattern, this time crocheting with color A and crocheting over color B.
TIP
To minimize the chance of the unused color peeking out, hold the unused color’s working yarn on the inside of the piece.

Still have questions?
How do I seamlessly change colors in crochet amigurumi?
Because amigurumi is usually crocheted in continuous rounds, each round is a spiral instead of a straight line. This makes color changes look jagged. To make them look smoother, you can replace the first stitch of the round in the new color with a slip stitch.
Still not happy with the results? There are other more complicated methods to achieve even smoother color changes like described in this video.
How do I change yarn color when double crocheting?
To change yarn color when double crocheting or really, any stitch at all:
1. When you get to the last stitch of the original color, pause before you do the last yarn over of the stitch.
2. Drop the old color and put the new color on your hook so that the yarn tail is in front of your hook. Yarn over, and pull the new color through the remaining loops on your hook.
3. Continue crocheting in the new color.
Still have a question? See our FAQ or e-mail us.
Add another yarn ball
Add another yarn ball
If you’ve used up all your yarn, add a new ball of yarn to keep on crocheting. This is called “joining” yarn. Adding a new ball of yarn in crochet uses the same technique you would use when changing colors, but instead of introducing a new color, introduce a new yarn ball.
Still have questions?
Which yarn is best for crochet?
If you’re looking for the best yarn for crochet, it really depends on what type of project you’re working on. If you’re a beginner learning to crochet amigurumi, the easiest yarn to use is The Woobles’ no-fray Easy Peasy Yarn, custom-made for beginners. Because this yarn is smooth, your hook will easily glide and it’s super easy to see your stitches. If you’re making a baby blanket, you might want to use a soft acrylic yarn like Dishie from Crochet.com. If you’re making something more intricate like a lace shawl, then a fine superwash merino wool yarn from Lion Brand or Bernat would work well. You can also find great options at Michaels, JOANN Stores, Etsy, and Walmart. No matter what type of project you have in mind, there’s sure to be a perfect yarn out there for you.
Which crochet hook do I use with which yarn?
Choosing the right crochet hook for your yarn can be a bit tricky. The best way to find out which hook to use is by looking at the yarn label. It should give you a recommended hook size for the yarn type and size. Generally, thinner yarns need smaller hooks while thicker yarns need larger hooks. If you’re crocheting amigurumi though, you’ll want to use a hook around 1mm smaller than what’s recommended on a yarn label. But since everyone crochets at different tensions, always test out a yarn with different hook sizes to see if you like the way the fabric works up and if it’s easy enough for you to crochet with the given yarn and hook size.
Still have a question? See our FAQ or e-mail us.
Use safety eyes
How to use safety eyes
Safety eyes are plastic bulbs that help give some character and life to your amigurumi, crochet stuffed toys. Safety eyes are easy to attach but difficult to remove. They come in multiple shapes, colors, and sizes. They’re measured in millimeters, which represent the diameter of the eye.
Safety eyes aren’t safe for children younger than 3 years old, or pets. If you don’t want to use safety eyes, simply embroider them on instead.
Watch the video below for a demonstration on how to attach safety eyes securely.
How to attach safety eyes to your amigurumi (step-by-step with photos)
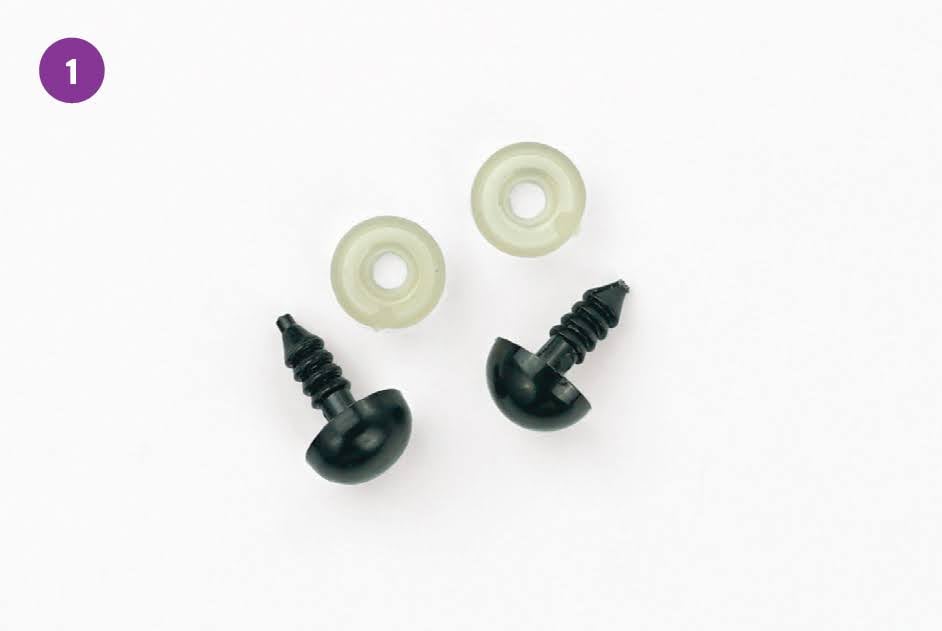
1. Safety eyes come with an eye and a backing.
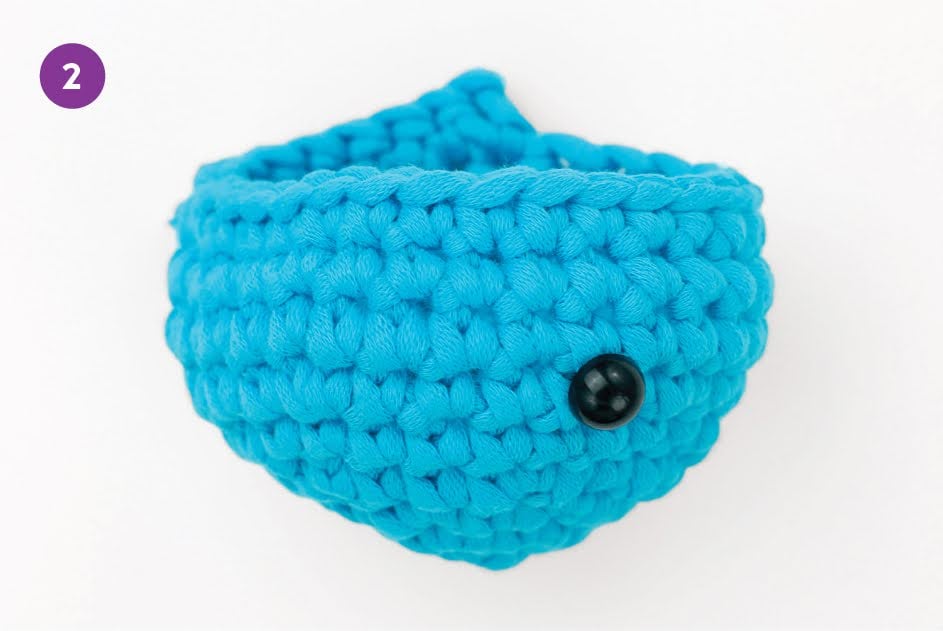
2. Make sure the “right side” of the piece is facing you. Insert the eye between two stitches.
3. On the inside of the piece, put the backing on the stem, flat side facing the yarn.

4. Push down on both sides of the backing to snap it into place. Push it far enough that it’s secure, but not so far that it distorts the piece.

5. Repeat steps 2–4 for the other eye. Count how many stitches away the second eye should be by counting the number of gaps that represent the space between stitches.
TIP
Before putting the backings on, put both safety eyes where the pattern instructs. Then adjust their placement if you think it could look better.
Still have questions?
What size safety eyes do I need for amigurumi?
The size of the safety eyes will depend on both your project’s size and your personal preference.
If you’re creating a small amigurumi piece or looking for a more subtle look to your design, 4 or 6mm works best. If you’re making something larger or want a more expressive look, 8 or 10mm safety eyes might work better. Ultimately it’s up to you – safety eyes can be as big as 30mm!
No matter which size you decide to go with though, make sure that they come with washer backings so that they stay securely attached.
Where can I buy safety eyes amigurumi?
There are lots of great places to find safety eyes for amigurumi. Depending on your budget and the size you’re looking for, you can check out craft stores like Michael’s or Jo-Ann Fabric & Craft, which often carry them in many sizes and colors. You could also look online; Etsy has a great selection of safety eyes from independent sellers at competitive prices. Amazon also carries safety eyes, from both local and worldwide sellers.
Can I use something besides safety eyes on crocheting?
There are lots of great places to find safety eyes for amigurumi. Depending on your budget and the size you’re looking for, you can check out craft stores like Michael’s or Jo-Ann Fabric & Craft, which often carry them in many sizes and colors. You could also look online; Etsy has a great selection of safety eyes from independent sellers at competitive prices. Amazon also carries safety eyes, from both local and worldwide sellers.
Still have a question? See our FAQ or e-mail us.
Stuff amigurumi
How to stuff amigurumi
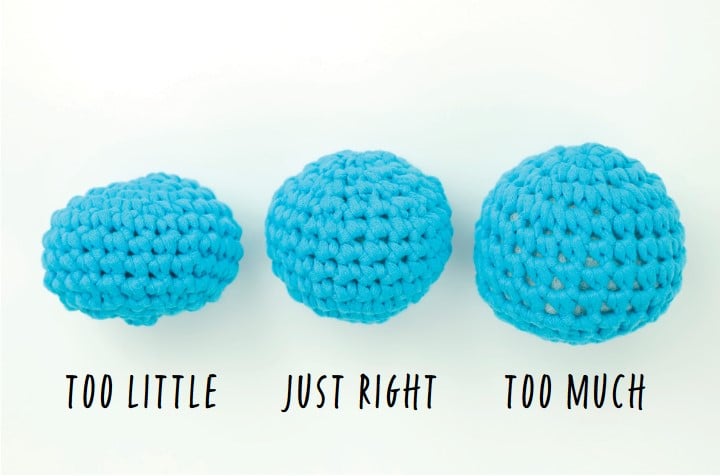
Amigurumi, crochet stuffed toys, are stuffed with polyfil. How you stuff an amigurumi greatly affects its final shape: lumpy or smooth, saggy or plump. If you don’t add enough, your amigurumi might sink in here or there. But if you add too much, you’ll be able to see the stuffing from the outside. It takes some time to learn how much stuffing is the right amount. Keep checking how it looks as you slowly add more stuffing in layers.
Watch the video below for two ways to stuff amigurumi, so that your piece stays smooth.
Here’s what the same pattern looks like when stuffed too little, just right, and too much, from left to right.
Stuffing Amigurumi (step-by-step with photos)

1. Pull apart a thin layer of stuffing. Shape it so that it’s about the same diameter as the bottom of the piece.

2. Tuck this layer of stuffing into the piece. Push down on all angles, even on the edges, to make it as flat as possible.
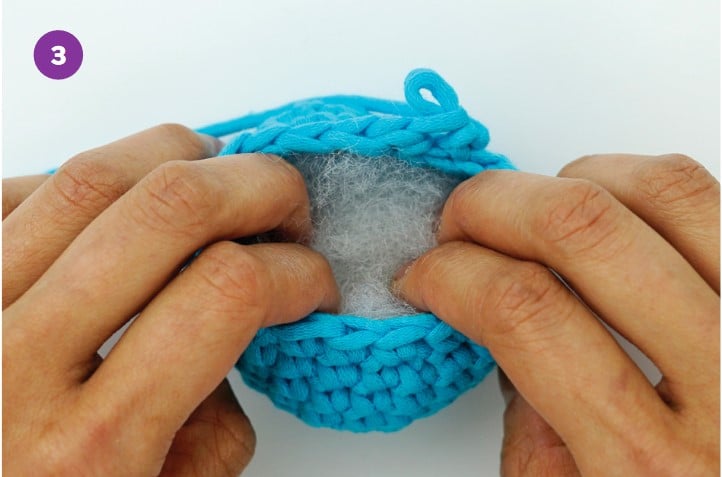
3. Repeat steps 1–2 until you’ve filled the whole piece, adjusting the diameter of the stuffing layer to match what you’re currently filling.
TIP
Use a chopstick to get into nooks and crannies.
Still have questions?
What do I stuff amigurumi with?
When it comes to stuffing amigurumi, you have a few options. Some people like to use traditional stuffing materials like polyester fiberfill. Others prefer to use natural materials like cotton or wool.
You can also experiment with different materials like plastic pellets, rice, or beans to give your amigurumi a different weight or texture. It’s all about personal preference. You can use whatever you have available and what you like best.
Just make sure that whatever you’re stuffing your amigurumi with is safe, clean, and non-toxic. Oh, and don’t overstuff it. You don’t want your amigurumi to be too stiff or hard. You also want to be careful not to add too little stuffing as your amigurumi may sink in here and there. Have fun!
How do I evenly stuff amigurumi?
To make sure your amigurumi is stuffed evenly, break up the stuffing into smaller chunks and layer them one by one into your amigurumi. This way you can make sure that the stuffing is distributed evenly throughout the piece, giving it a nice and fluffy (but not lumpy) shape.
Still have a question? See our FAQ or e-mail us.
Close a ball
How to finish amigurumi
A closed piece is a crochet piece that’s meant to be completely self-contained. Put another way – when it’s done, there should be no way to put stuffing inside it. A round closed piece usually ends with a series of decrease stitches. More often than not, there’s still a hole in the middle of the piece even after you’ve crocheted this final round. Watch the video below to learn how to sew this hole closed, and weave in your yarn tails to keep your yarn nice and secure:
How to undo crochet stitches(step-by-step with photos)

1. Identify the stitch you want to keep.

1. Identify the stitch you want to keep.

1. Identify the stitch you want to keep.
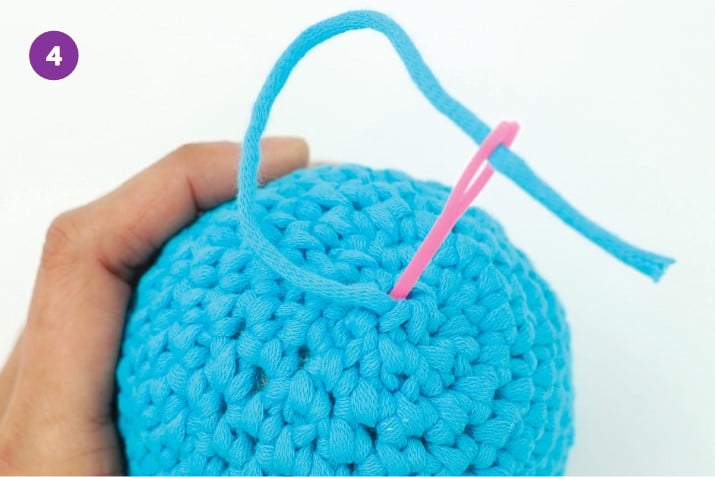
2. With your right hand, hold onto the top loops of the stitch you want to keep.
Still have questions?
Still have a question? See our FAQ or e-mail us.
Hide yarn tails
How to hide yarn ends in crochet
When you’re done with a 3D piece, make sure the yarn won’t unravel by hiding the yarn tails.
How to hold a crochet hook (step-by-step with photos)

1. Thread a needle with the yarn tail of the last stitch. Insert the needle into the hole that the yarn tail came out of.

2. Pull it out on the other side of the piece. Tug as hard as you need to, to hide the yarn inside the piece.
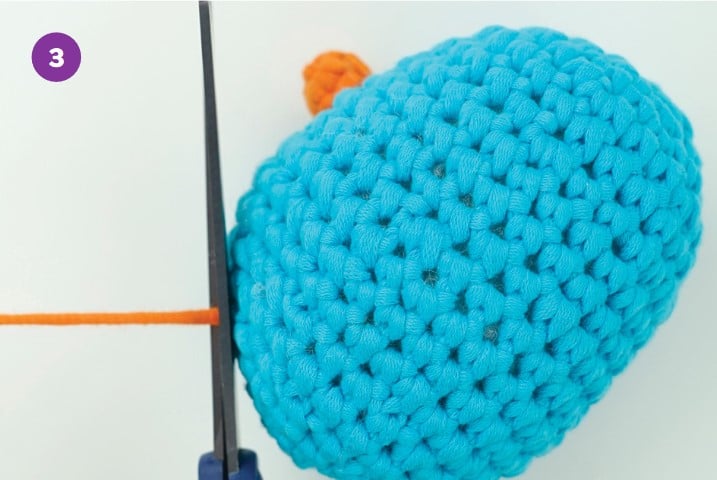
3. Cut the yarn tail as close to the piece as possible. Then massage the piece until the yarn tail disappears inside the piece.
Still have questions?
Still have a question? See our FAQ or e-mail us.
Embroider eyes
Embroider eyes
This tutorial shows how to embroider eyes on crochet amigurumi. It’s a beginner-friendly guide that even a seasoned crocheter can benefit from.
Embroider blush
Embroider blush
Learn how to add realism and pizzazz to your crochet amigurumi with this easy tutorial on embroidering blush.
Embroider a curve
Embroider a curve
Learn how to embroider curves on crochet amigurumi with this easy tutorial. Curves add a touch of personality to your plushies.
Embroider a nose & mouth
Embroider a nose & mouth
This step-by-step tutorial teaches how to add some extra personality and realism to your crochet creatures by embroidering a nose and mouth on them.
Fasten off
How to fasten off in crochet
Finishing off a crochet project can be one of the most satisfying parts of the process. Knowing how to fasten off correctly is essential for ensuring that your work doesn’t unravel or come undone. Fastening off in crochet is a simple process, but there are a few different techniques you can use depending on what type of project you’re working on. In this tutorial, we’ll show you two different ways to finish off your crochet projects.
How to fasten off in crochet (step-by-step with photos)
When you’ve finished the last stitch, patterns will often tell you to “fasten off leaving a long tail.” A long yarn tail is usually at least 6 inches long, or if you’re sewing the piece onto something else, at least the length of the current piece’s edge. Fastening off keeps the piece together.
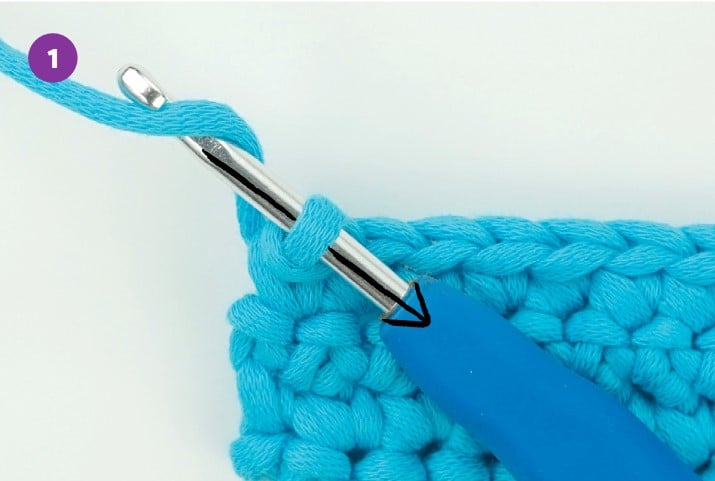
1. Finish the last stitch, then yarn over. Pull the yarn through the loop on the hook. There should be one loop left on the hook.

2. Cut the yarn at least 6 inches away from the intersection point.
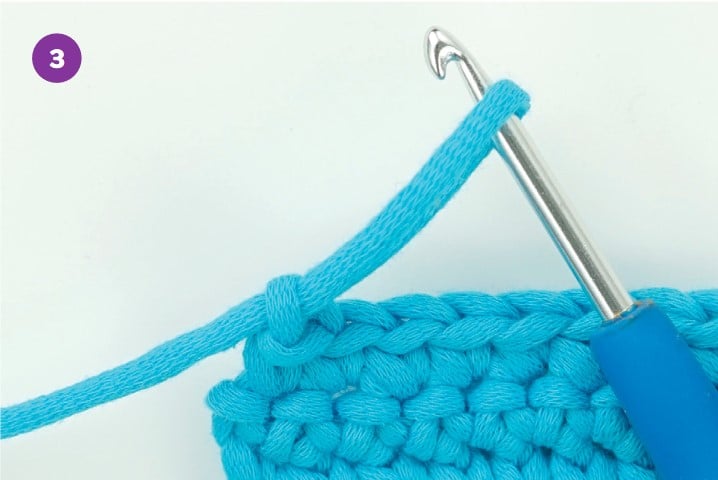
3. Keep pulling the yarn all the way through loop until you have a knot. If you’re done crocheting a flat piece, weave in the yarn tails.
How much yarn should you leave? It depends. If you’re planning to hide the yarn tail, which is called weaving in the yarn tail, leave enough so you can comfortably thread a needle and weave in the tail. If you’re going to join this piece to another, leave enough yarn to do that and weave in the remaining tail. The way you weave in the yarn tail depends on if you’re finishing a flat piece, or a round closed piece.
Still have questions?
What does fasten off in crochet mean?
Fastening off in crochet is an essential technique when finishing a project. It’s a way of drawing the loose yarn tails through the loop on your hook, then removing the hook and pulling on the tails to tighten so they don’t unravel and ruin all your hard work.
Still have a question? See our FAQ or e-mail us.
Invisible fasten off for open edges
How to finish an open edge with the invisible fasten off
For amigurumi pieces that’ll be sewn onto another piece but with the edge still visible, there’s a slightly smoother way to finish the piece. Like the regular fasten off, once you’ve finished your last stitch, cut the yarn to make a tail. Remember to leave a tail long enough so that you can use it to sew this open piece onto another piece.
How to do the invisible fasten off in crochet (step-by-step with photos)
For pieces that’ll be sewed onto another, or for a piece where the edge will be seen, you can use a technique called the “invisible fasten off.” This technique makes the edge look smooth.
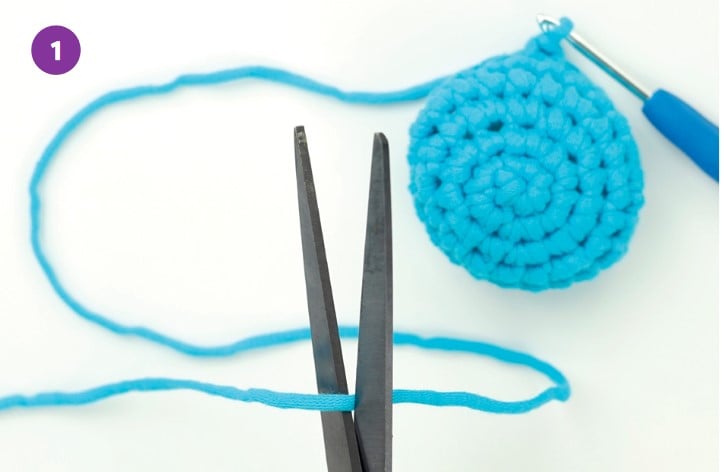
1. Finish the last stitch and cut the yarn so that the yarn tail is at least 6 inches longer than the circumference of the rim of the piece.
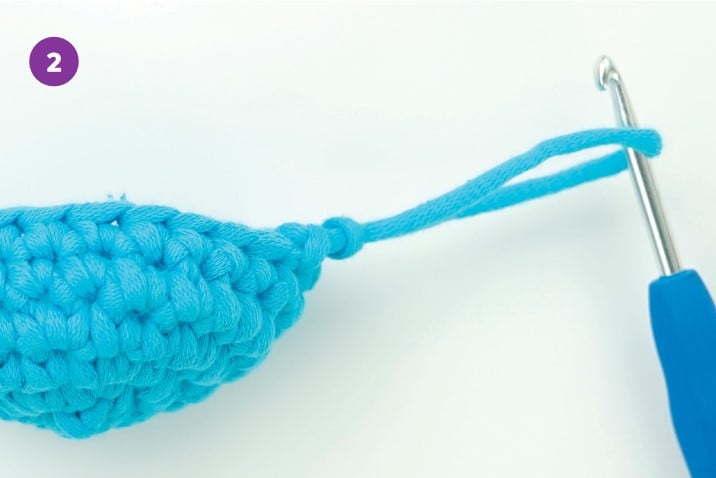
2. Pull the hook away from the piece until there’s no loop left on the hook. Thread a needle with the yarn tail.

3. Skip the next stitch. Insert the needle under the top loops of the stitch after that, from the outside to the inside of the piece.

4. Before pulling it tight, insert the needle under the back loop of the stitch the yarn tail came out from.
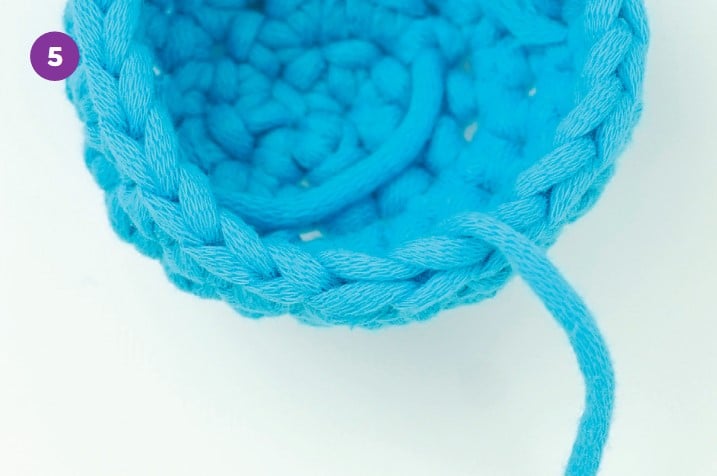
5. Pull the yarn tail tight enough so that it’s the same size as the other stitches along the rim.
How much yarn should you leave? It depends. If you’re planning to hide the yarn tail, which is called weaving in the yarn tail, leave enough so you can comfortably thread a needle and weave in the tail. If you’re going to attach this piece to another, leave enough yarn to do that and weave in the remaining tail. The way you weave in the yarn tail depends on if you’re finishing a piece crocheted in rows, or finishing a piece crocheted in rounds.
Still have questions?
What is an invisible fasten-off?
An “invisible fasten-off” is a technique used to finish off a round crochet piece neatly and invisibly, so that the rim of your piece looks smoother. It’s mostly used in amigurumi and other crocheted items where you want to have a seamless finish.
Still have a question? See our FAQ or e-mail us.
Sew a flat piece onto a 3D piece
How to Sew a flat piece onto a round piece in crochet
Crochet is a wonderfully versatile craft that allows you to create a wide range of items, from cozy blankets to stylish hats and everything in between. One of the challenges of working with crochet is figuring out how to sew a flat piece onto a round piece, such as when you’re making a stuffed animal. This can seem daunting at first, but with a few simple techniques and some practice, you’ll be able to seamlessly attach flat pieces to round ones in no time. In this tutorial, we’ll walk you through the steps to achieve this.
Sewing a flat piece onto a round piece (step-by-step with photos)
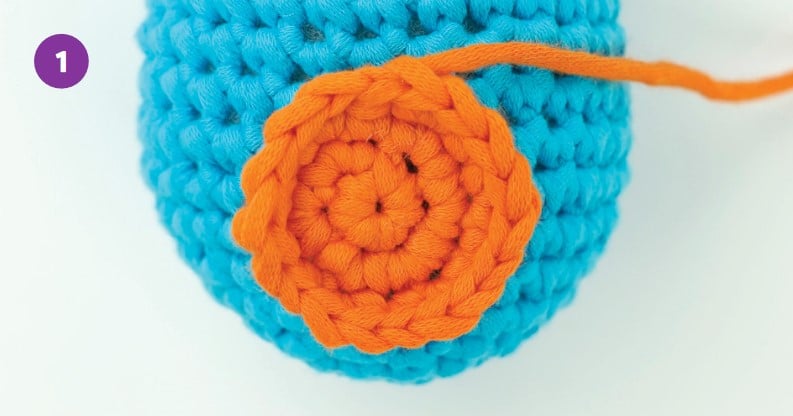
1. Invisible fasten off the flat piece (Piece A). Hold Piece A on top of the other piece (Piece B), with the “right side” visible.
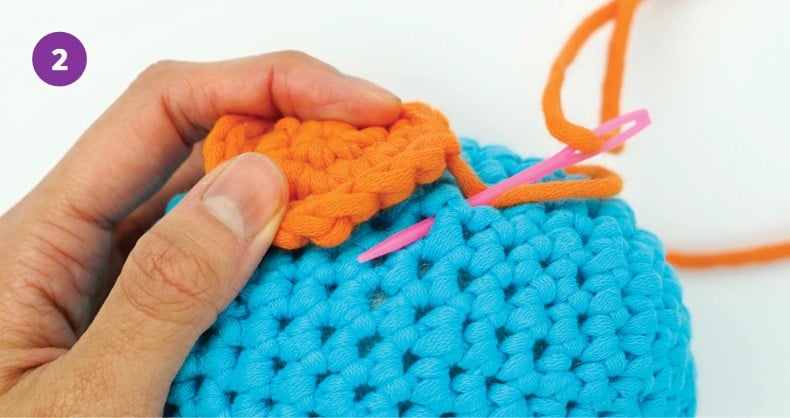
2. Thread a needle with Piece A’s yarn tail from the invisible fasten off. Insert the needle into Piece B right under the point where the yarn tail came out from. Pull it out of Piece B one stitch over, following the edge of the Piece A. Pull the yarn tight after every step.
TIP
Use pins to hold Piece A in place as you sew it on.
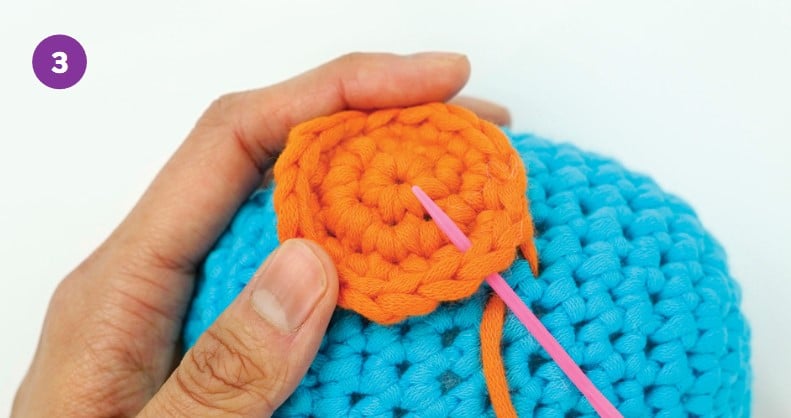
3. Insert the needle under the top loops of Piece A from the bottom up, directly above where it came out of Piece B.
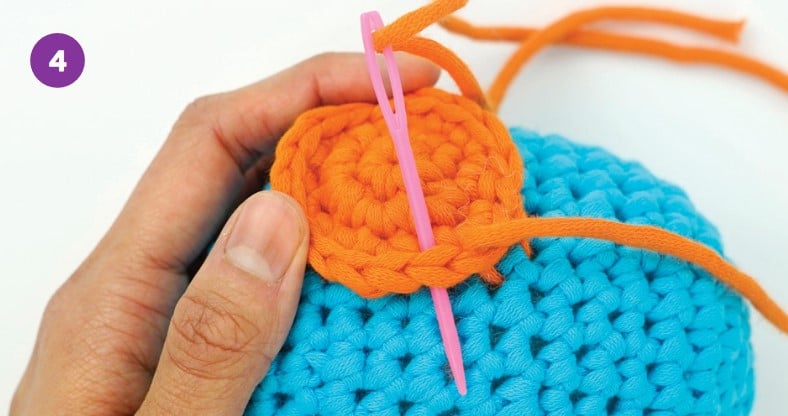
4. Insert the needle under the top loops of the next stitch of Piece A from the top down.

5. Insert the needle into Piece B, directly below where it came out of Piece A. Pull it out of Piece B one stitch over, following the edge of Piece A.
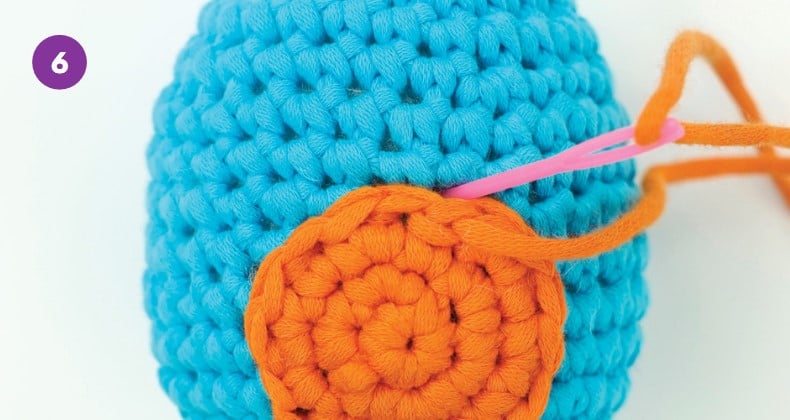
6. Repeat steps 3–5 until all of Piece A is sewn onto Piece B. To finish, hide the yarn tail in the piece.
Still have questions?
Still have a question? See our FAQ or e-mail us.
Sew amigurumi parts together
How to sew amigurumi parts together
Almost all amigurumi require pieces to be put together, whether that’s an arm to a body or a beak to head. The method below explains how to join an open piece to a closed piece. With this method, the seam and remaining yarn tail should be invisible.
How to hold a crochet hook (step-by-step with photos)

1. Invisible fasten off the piece being sewn on (Piece A).

2. Hold Piece A on top of the other piece (Piece B), with the “right side” visible. Thread a needle with Piece A’s yarn tail from the invisible fasten off. Insert the needle into Piece B right under the point where the yarn tail came out from. Pull it out of Piece B one stitch over, following the edge of the Piece A. Pull the yarn tight after every step.
TIP
Use pins to hold Piece A in place as you sew it on.
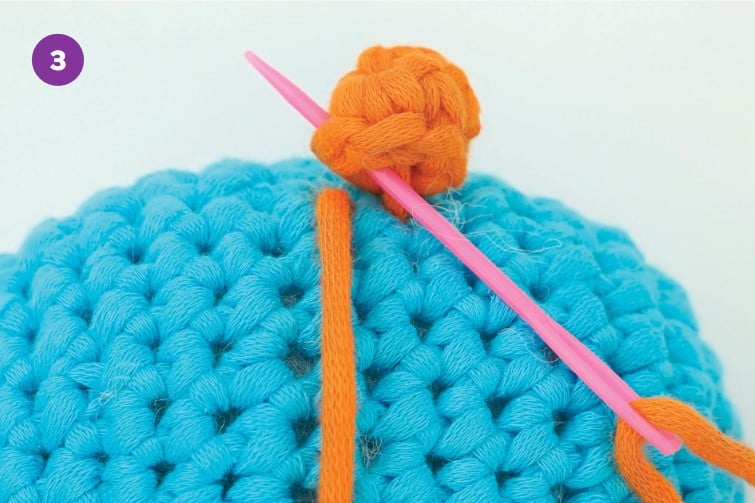
3. Insert the needle under the top loops of Piece A from the bottom up, directly above where it came out of Piece B.
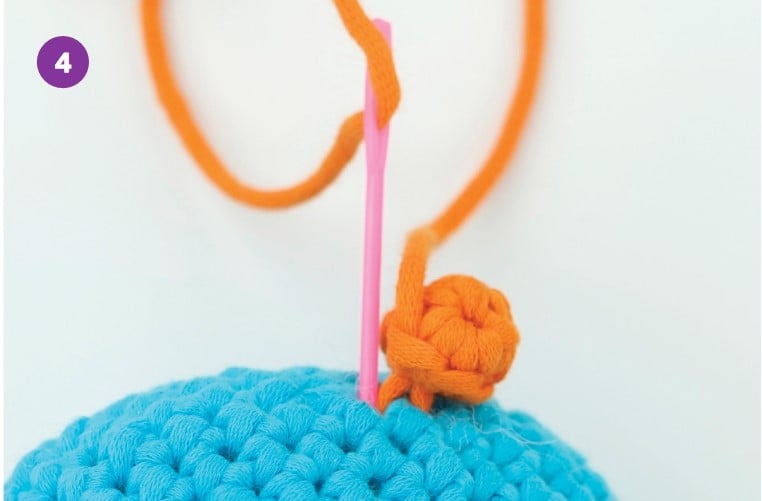
4. Bring the needle over the top loops of the same stitch on Piece A and insert it into the same hole it just came out of.
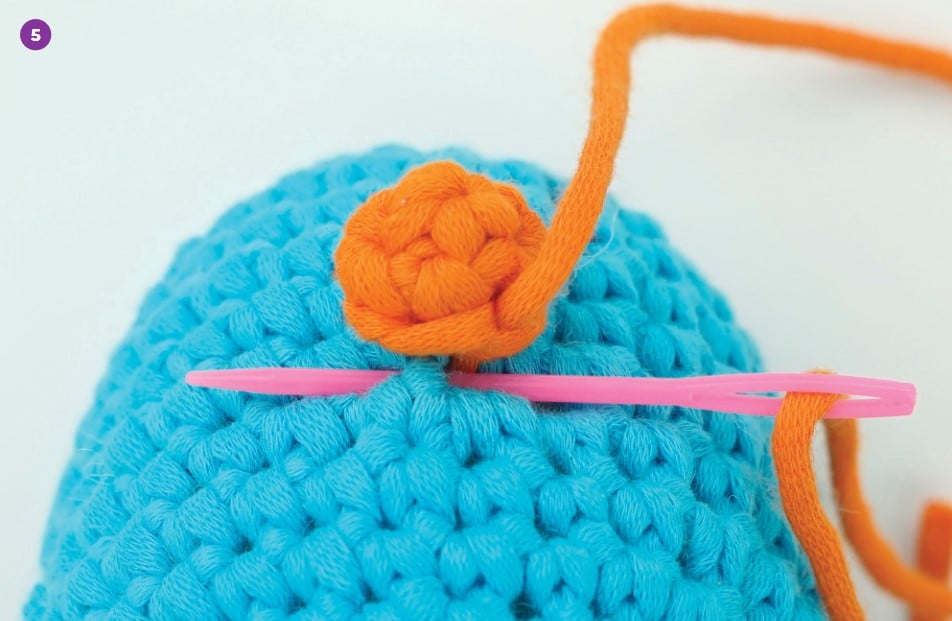
5. Pull it out of Piece B one stitch over, following the edge of Piece A.

6. Repeat steps 3–5 until all of Piece A is sewn onto Piece B. To finish, hide the yarn tail in the piece.
Still have questions?
How do I join amigurumi legs?
Alright, so you’ve got your amigurumi legs and body all ready to go, and now you want to join them together. Here’s how you do it:
1. Make sure that both legs and the body are facing the right side out.
2. Thread a yarn needle with the leg’s yarn tail. Take one leg and line it up with the body, so that the top of the leg is lined up with the bottom of the body.
3. Put the needle around a stitch on the body that matches up with where the yarn tail is coming out of.
4. Bring the needle back under the same top loops of the same stitch it just came out of on the leg, and pull it out under the top loops of the next stitch on the leg.
5. Repeat step 3 and 4 until you’ve sewn the entire leg to the body.
And that’s it! Just make sure to pull tight every time you sew together stitches, and don’t forget to weave in the yarn tails after you finish. Repeat this with the second leg.
If you’re more of a visual learner, here’s a step-by-step tutorial.
Still have a question? See our FAQ or e-mail us.
Weave in ends
How to weave in ends in crochet
When you’re done crocheting a flat piece and fastening off, make sure your yarn doesn’t unravel by weaving in both yarn tails.
How to hold a crochet hook (step-by-step with photos)
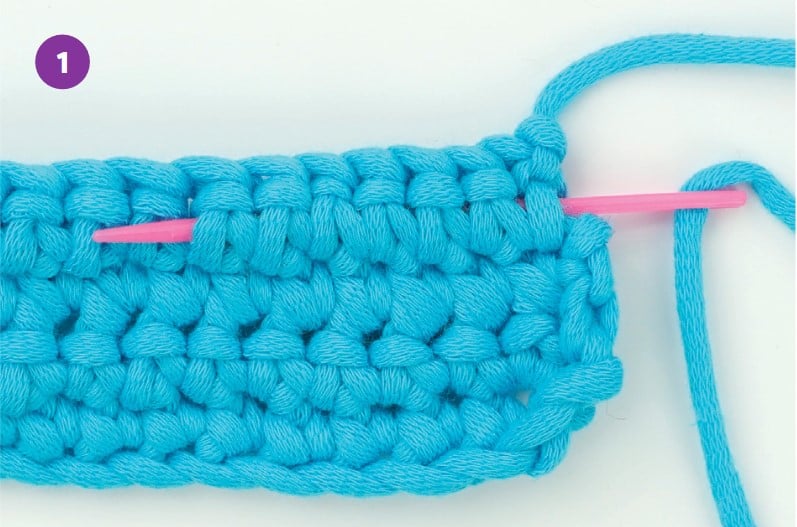
1. Thread a needle with the yarn tail. Insert it behind a few stitches of the last row and pull the yarn through.

2. Skip the last vertical piece of yarn the needle just went under and insert the needle under the same stitches in the opposite direction.

3. Cut the yarn tail as close as possible to the piece and massage the piece until the yarn tail Disappears.
Still have questions?
What’s the best way to weave in ends in crochet?
You can buy crochet hooks and yarn at a variety of places. Some popular options include craft stores like Michael’s or Jo-Ann, online retailers like Amazon or Etsy, and even big-box stores like Walmart or Target. You can also check out your local yarn store. They’ll have a wide selection of yarns and crochet hooks. You can also buy crochet hooks and yarns online on websites like LoveCrafts.
How do I avoid weaving in ends in crochet?
Weaving in ends in crochet can be a tedious task. To minimize the number of tails you need to weave in, you can crochet over a yarn tail you know you won’t use. As you crochet the next round or row, just place the yarn tail on top of the top loops of whatever stitch you’re crocheting into.
Still have a question? See our FAQ or e-mail us.
Whip stitch
Whip stitch in crochet
The whip stitch is an essential crochet technique that is used to join two pieces of fabric together. It’s also sometimes called an overcast stitch or an oversewing stitch and can be used for both decorative purposes and for joining seams.Even though it’s called a stitch, a “whip stitch” is a sewing technique that uses a needle. It’s used to sew two edges with the same number of stitches together. For this technique, always pull the needle through stitches in the same direction.
Watch the video below to learn how to do the whip stitch.
How to do the whip stitch in crochet (step-by-step with photos)

1. Thread a needle with the yarn tail. Line up the two edges that’ll be sewn together. Insert the needle under the top loops of the other piece’s edge, starting from the same end as the yarn tail. Remember to pull tight after every whip stitch.

2. Insert the needle under the top loops of the next pair of stitches on opposite pieces. Remember to insert the needle in the same direction as the previous step.

3. Repeat step 3 until you’ve whip stitched together all the top loops. Weave in the yarn tail on the “wrong side” of the piece.
Still have questions?
What is a whip stitch?
A whip stitch is a basic hand-sewing stitch used to join two pieces of fabric together. It’s called a “whip” stitch because the needle is whipped in and out of the fabric. It’s a simple but strong stitch that’s great for closing seams or attaching trim to a piece of fabric.
What is a running whip stitch?
A running whip stitch is a variation of the basic whip stitch. Instead of going in and out of the fabric at the same spot, you move along the edge of the fabric while keeping the stitches close together, giving it a “running” look. This technique is often used to attach two fabric pieces. It’s also known as the overcast stitch, which is a fast and decorative way to sew by hand. This method can be applied on different types of fabrics, whether it be woven, crocheted, or knitted.
Still have a question? See our FAQ or e-mail us.
Slip stitch join (sl st join)
How to slip stitch join in crochet
If you’ve ever wondered how to seamlessly join rounds and seam pieces together, then you’re in the right place. In this tutorial, we’re going to walk you through the simple steps of the slip stitch join, a versatile technique that you can use for all sorts of projects – from hats and scarves to blankets and amigurumi, to create a seamless join. With the slip stitch join, you’ll be able to achieve a neat and tidy finish without any noticeable seam or gap.
Joining with a slip stitch in crochet (step-by-step with photos)
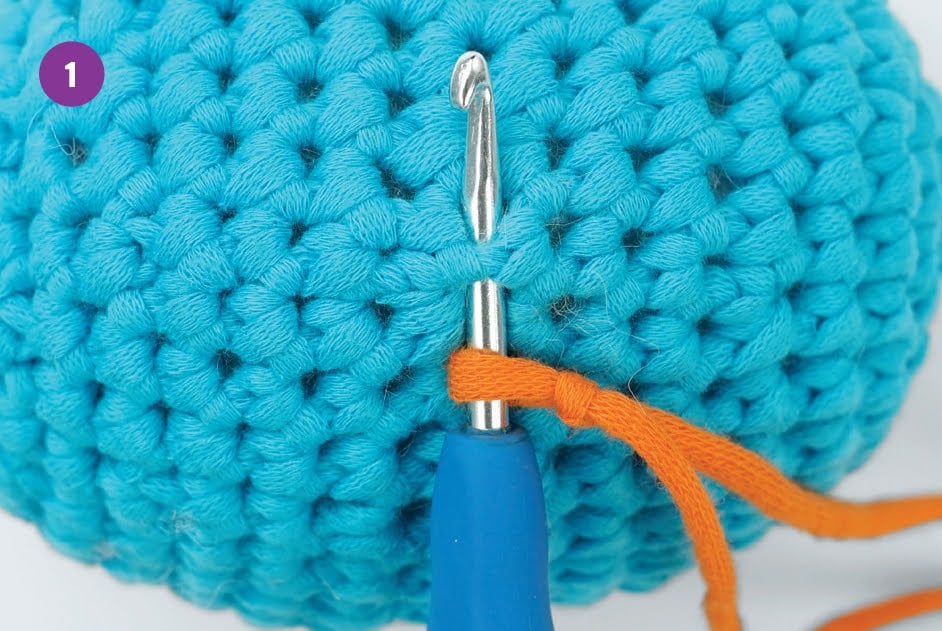
1. Make a slip knot and put it on the hook. Insert the hook under the top loops of the stitch where you’ll be making the sl st join.
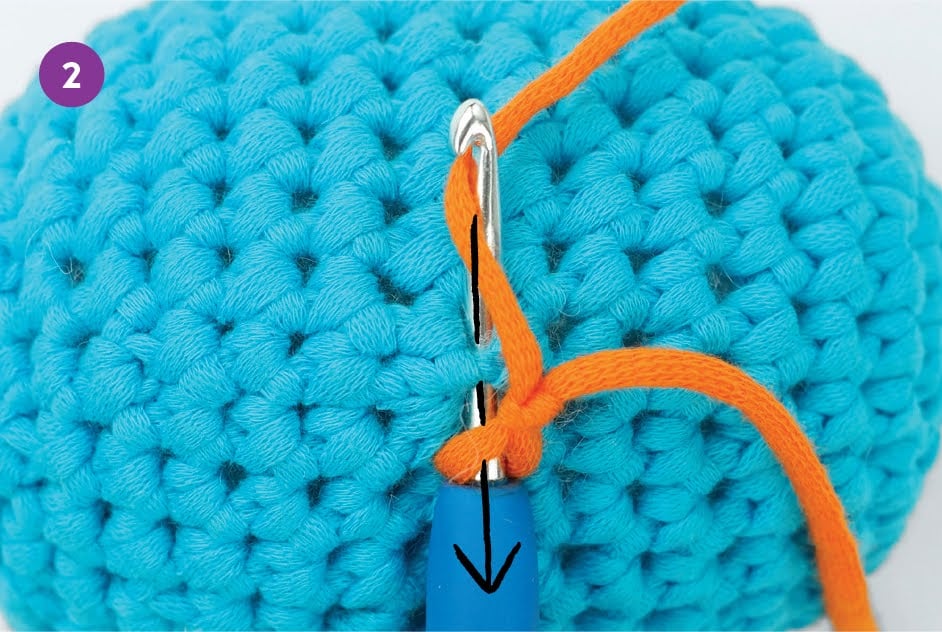
2. Yarn over. Pull the yarn through the stitch and loop on hook to draw up a loop. There should be one loop left on the hook.
Still have questions?
How do I join new yarn with slip stitch in crochet?
To join new yarn with a slip stitch in crochet, make a slip knot with the new yarn. Insert your hook into the original piece wherever the pattern says to, yarn over with the new yarn, and pull it through both loops on your hook. This creates a slip stitch that joins the new yarn to the original piece.
Once you’ve joined the new yarn, you can continue crocheting as usual.
When do I use a slip stitch join in crochet?
When you need to join two pieces of crochet together, a slip stitch join is the perfect way to do it. This technique is great for joining granny squares, adding yarn to a finished piece, and more.
Does the slip stitch count as a stitch in crochet?
Whether or not the slip stitch (often abbreviated as sl st) counts as a stitch depends on the pattern. If you’re working a round of only slip stitches, it counts as a stitch. But for example, if you’re crocheting in joined rounds, the slip stitch is used a stitch to connect the rounds and isn’t considered a stitch.
Still have a question? See our FAQ or e-mail us.
Crochet through front or back loops only (flo, blo)
Crochet through front or back loops only (flo, blo)
Learn how to crochet through the front and back loops only (flo/blo). These are great techniques for creating ribbed and taller stitches in your amigurumi projects.
Turn a chain into a ring
How to turn a chain into a ring
Learn how to turn a crochet chain into a magic ring. This technique is perfect for starting any round crochet project – from amigurumi to doilies, and everything in between. With just a few simple steps, you’ll be able to transform that chain into a perfect circle, ready for all your crocheting needs. So, grab your hook and yarn, and let’s get started!
Still have questions?
Still have a question? See our FAQ or e-mail us.
Embroider on amigurumi
How to embroider on crochet
If an amigurumi piece has embroidered details, it’s usually the very last step. These tutorials walk you through a few common details you might want to embroider onto your amigurumi to either give them a little bit more pizzaz or, in the case of embroidered eyes, make them safe for kids and pets.
How to embroider amigurumi eyes (step-by-step with photos)
Finish the piece that’ll be embroidered onto.

1. Thread a needle with an arm’s length of black yarn. Insert the needle somewhere on the right side of the amigurumi, and out where you want the bottom of the right eye to be. Leave a 6-inch yarn tail.
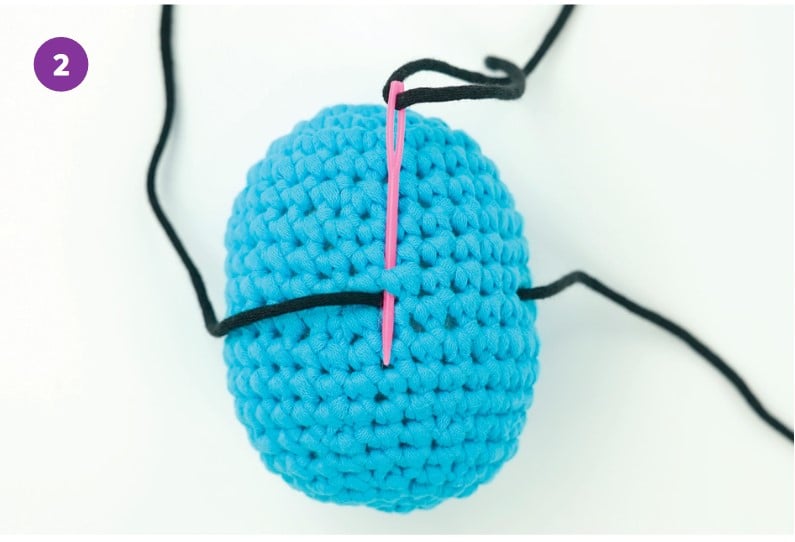
2. Insert the needle one round up and pull it out the same bottom point of the right eye.
TIP
Be careful not to pull the yarn too tight, otherwise the stuffing might be visible above and below the eye.

3. Repeat step 3 until the eye is as big as you want, probably at least four times. To make the other eye, insert the needle into the top of the current eye, and pull it out where you want the bottom of the second eye to be.

4. Repeat step 3 until the eye is as big as you want. To finish, insert the needle into the top of the current eye and pull it out from the same hole it originally went in, so that both yarn tails are coming out of the same hole.
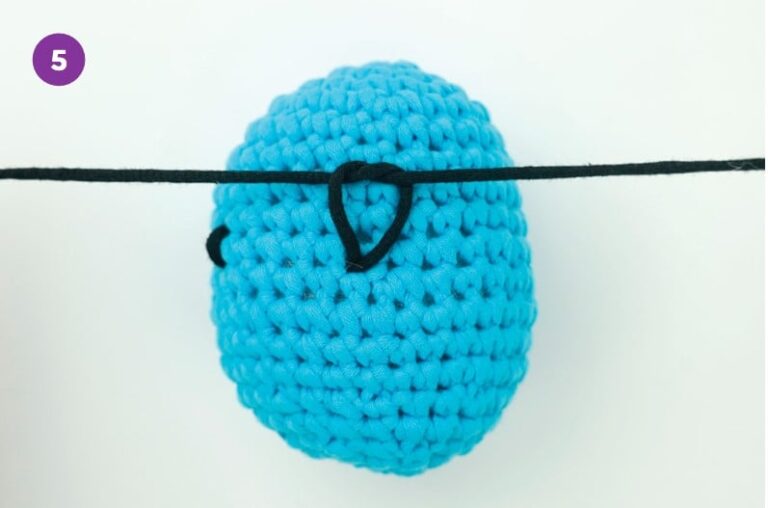
5. Tie a knot with both yarn tails, as close to the surface of the piece as possible. Hide the yarn tails in the piece.
How to embroider blush (step-by-step with photos)
Finish the piece that’ll be embroidered onto.

1. Thread a needle with an arm’s length of pink yarn. Insert the needle somewhere on the right side of the amigurumi, and out under the left side of the right eye. Leave a 6-inch yarn tail.
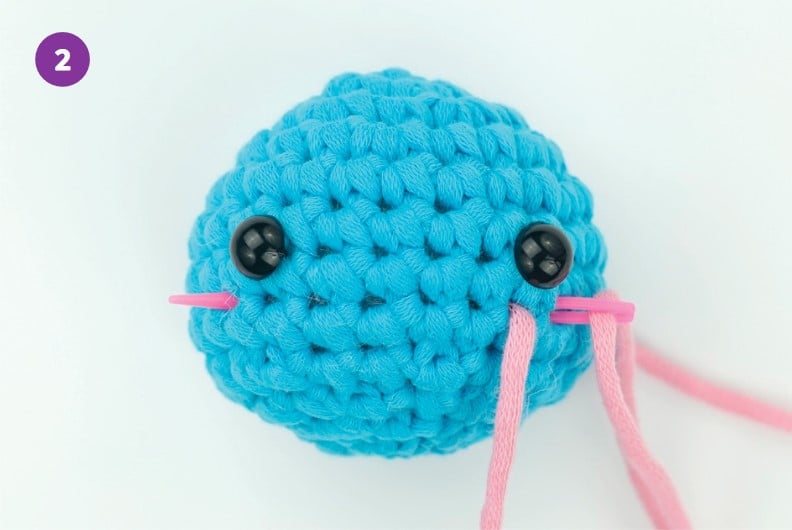
2. Insert the needle one stitch to the right, and out under the left side of the left eye.
TIP
Be careful not pull the yarn too tight, otherwise the stuffing might be visible around the blush.
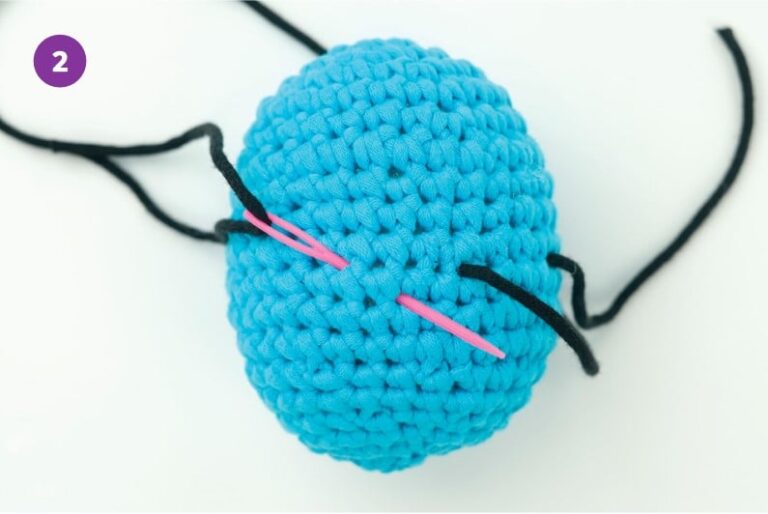
3. Insert the needle one stitch to the right and pull it out the same hole where it originally went in, so that both yarn tails are coming out of the same hole.
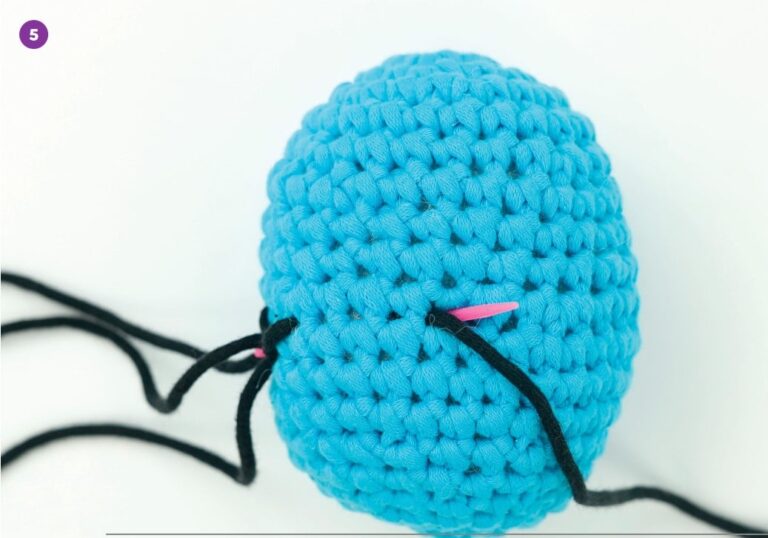
4. Tie a knot with both yarn tails, as close to the surface of the piece as possible. Hide the yarn tails in the piece.
How to embroider a curve (step-by-step with photos)
Finish the piece that’ll be embroidered onto.

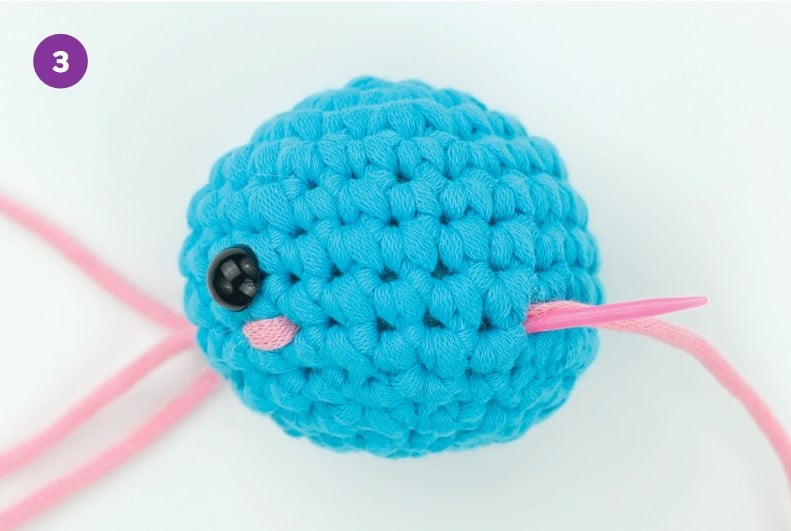
1. Thread a needle with an arm’s length of black yarn. Insert the needle somewhere on the right side of the amigurumi, and out where you want the right end of the curve to be. Leave a 6-inch yarn tail.
2. Insert the needle where you want the left side of the curve to be, and out where you want the bottom of the curve to be.

3. Pull the yarn just tight enough so that the curve looks like how you want it.

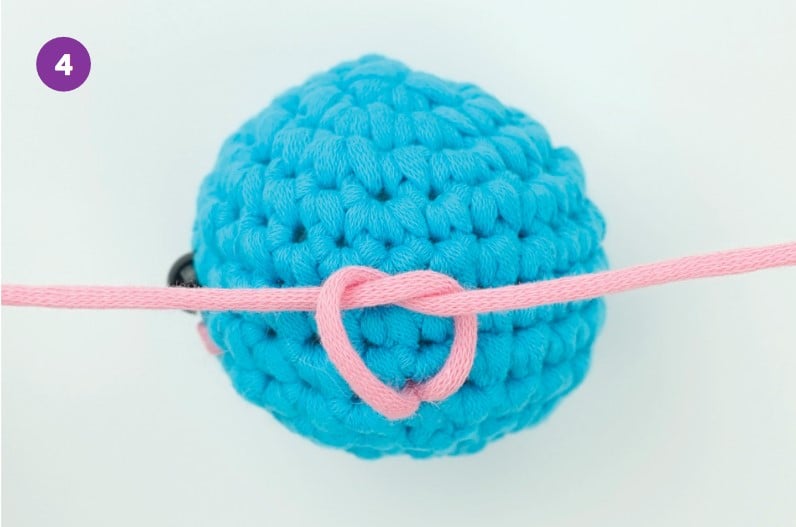
4. Make sure the needle and yarn came out below the curve. Then bring the needle up and over the curve, and insert the needle in the same hole it just came out of. Pull tight to secure the curve.
5. Pull the needle out of the same hole in the piece it originally went into, so that both yarn tails are coming out of the same hole.
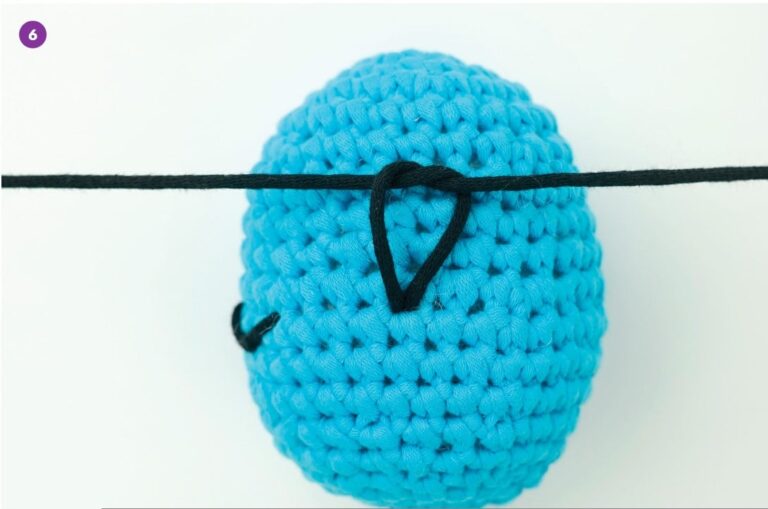
6. Tie a knot with both yarn tails, as close to the surface of the piece as possible. Hide the yarn tails in the piece.
How to embroider a nose and mouth (step-by-step with photos)
Finish the piece that’ll be embroidered onto.
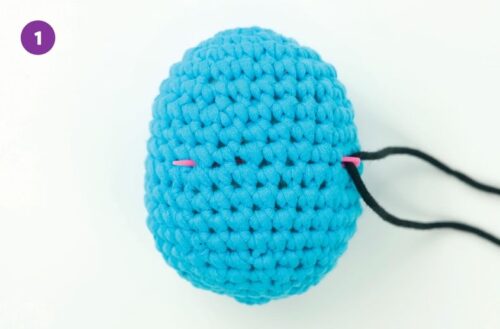
1. Thread a needle with an arm’s length of black yarn. Insert the needle somewhere on the right side of the amigurumi, and out where you want the left side of the nose to be. Leave a 6-inch yarn tail.
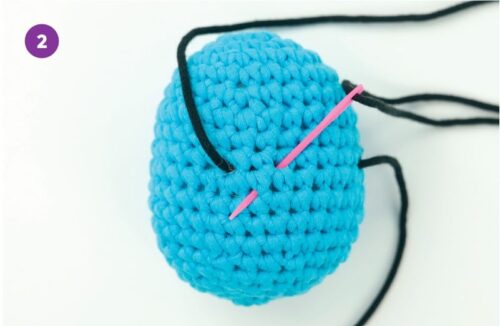
2. Insert the needle where you want the right side of the nose to be, and out below the nose, centered between the left and right sides of the nose.
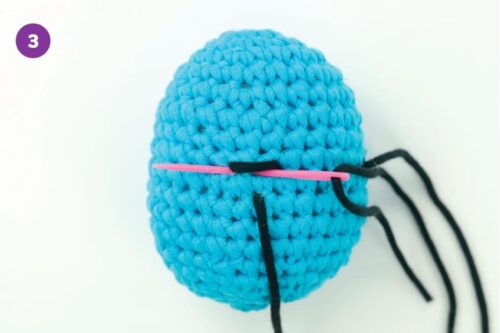
3. Insert the needle between the left and right points of the nose. Pull it out on the left side of the nose.

4. Insert the needle in the right side of the nose, and out the left side of the nose.
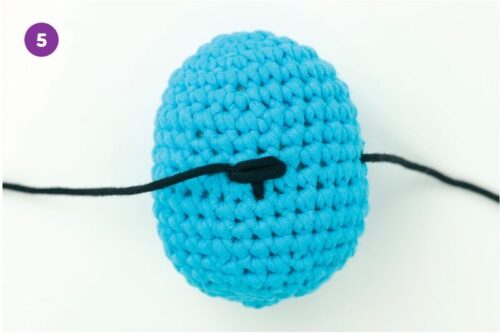
5. Repeat step 5 until the nose is as big as you want, probably at least 4 times.

6. Insert the needle in the right side of the nose and pull it out the same hole in the piece it originally went into, so that both yarn tails are coming
out of the same hole.
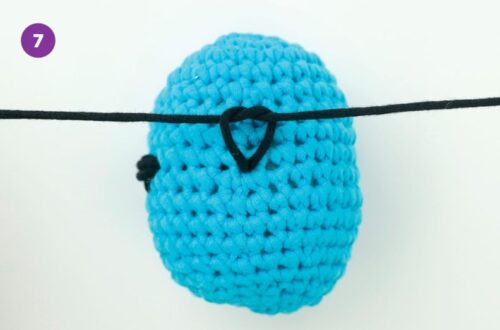
7. Tie a knot with both yarn tails, as close to the surface of the piece as possible. Hide the yarn tails in the piece.
Still have questions?
How do I embroider eyes on crochet amigurumi?
Embroidering eyes on amigurumi is a fun and easy way to add personality and character to your creations. It’s a simple process that even beginners can do with the right tools and instructions.
Can you embroider on crochet?
Yes, you can embroider on crochet. Embroidery is a great way to add texture and color to your crochet. There are a variety of stitches you can use to spruce up your projects, such as decorative stitches, surface crochet embroidery, and lace embroidery. If you’re looking for some guidance on how to get started with embroidering on crochet, there are plenty of helpful tutorials online.
Can you machine embroider on crochet?
Yes, you can machine embroider on crochet. It’s a great way to add some extra flair to your crochet projects. All you need is the right stabilizer and a few basic techniques. You can use doubled embroidery floss or yarn with a blunt tapestry needle, layer a stabilizer over your item, and follow the crocheter’s basic stitches and techniques.
Still have a question? See our FAQ or e-mail us.
Find mistakes
How to find and fix crochet mistakes
Crochet is a great hobby to pick up, but it can be intimidating for beginners. It’s easy to make mistakes, and it can be hard to know how to fix them. But don’t worry! In this video tutorial, we’ll show you two ways to find crochet mistakes: by looking at the stitches and by undoing the stitches. We’ll also provide some helpful tips on avoiding common beginner crochet mistakes in the first place.
Still have questions?
Why is my crochet piece uneven?
There could be a few reasons why your crochet piece is uneven:
Tension: It’s possible that your tension is uneven, which can make your stitches tighter or looser depending on the area. This can happen when you’re starting out and you haven’t quite mastered the feel of the yarn and hook. To better control your tension, check the size of every loop on your hook. Any time there’s a loop on your hook, try to make the loop the same size as all the other loops.
Not counting stitches: If you’re not counting your stitches as you work, it’s easy to lose track of where you are in a pattern. This means you might be crocheting the wrong stitches at the wrong parts, which could lead to a lopsided piece.
Not paying attention to the pattern: If you’re not paying attention to the pattern, you might be making mistakes that can cause unevenness in your piece.
Yarn quality: Sometimes yarn can vary in thickness, which can cause unevenness in your piece.
The good news is that most of these issues can be fixed by practicing or paying more attention as you crochet. Just take a step back and take a look at how you crochet. Try to identify where the problem is and work on fixing it.
What are the most common crochet mistakes?
Here are some of the most common crochet mistakes and how to fix them:
Not knowing what size hook to use: This is a very common mistake for beginners, as it can be difficult to find the right size hook for your project. Pick a hook size that works for the yarn you have. The best way to do that is by checking your pattern or yarn label for the recommended hook size. But since everyone crochets at different tensions, do a few trial stitches first to make sure you’re happy with the density of the fabric you’re making and the shape of the piece. For example, if your hook is too small for the yarn that you’re using, your fabric might be super dense and it might curl unnecessarily.
Not counting stitches: This is a common mistake, especially when you’re working on a pattern that involves a lot of counting. Where you put what types of stitches affects the final look of your piece. If you lose track of where you are in the pattern, you can wind up with a doily instead of a penguin.
Your project keeps getting wider and wider: This is usually caused by accidentally adding extra stitches in a row or round. To avoid this issue, always make sure you have the correct number of stitches in each row or round as you go.
Confusing US and UK terms: Always check a pattern to see if it’s written in US or UK terminology. Certain phrases mean different things in different countries. For instance, a single crochet in US terms is called a double crochet in UK terms.
Forgetting to turn: When working in rows, it’s common to forget to turn your work. This results in a completely different shape than what a pattern intended.
Not using stitch markers: Stitch markers help you keep track of what row or round you’re on. Without them, it’s easy to lose track of where you are in a crochet piece. If you make a mistake, without stitch markers, it becomes hard to figure out where the mistake is and you might need to frog a lot of your piece to get back on track!
Still have a question? See our FAQ or e-mail us.
Need help with your project? Visit the Help Center or contact VIOIV.